
Easy DIY ideas for a soft, cheerful spring season
There’s something so refreshing about the first signs of spring, longer days, blooming tulips, and that little urge to freshen everything up. If you’re craving an easy way to brighten your home, you’re in the right place. Today I’m sharing a handful of simple spring and Easter crafts that look surprisingly beautiful without feeling like a big project. From vintage-style floral eggs to recycled egg carton chicks, these ideas add a soft, handmade touch to your seasonal decor.
Here are five trending spring crafts (plus one bonus kids will love).
✨ Jump to Your Favorite Craft
Why Spring Crafts Feel So Good
Spring has a way of making everything feel new again. After a long winter, a little crafting is the easiest way to refresh your space and your mood.
These spring and Easter crafts aren’t just about the final look. They’re about the feel of making them: air-dry clay in your hands, soft paper napkins, and that satisfying moment when a wreath comes together. Whether you’re making gifts or simply enjoying a quiet creative break, these projects are designed to be simple and stress-free.

Bring a soft, festive glow to your home with this pre-lit Easter egg tree. Featuring flexible, bendable branches adorned with colorful pastel eggs and realistic greenery, it’s the perfect centerpiece for entryways or dining tables. Since it's battery-operated, you can skip the messy cords and place it anywhere to instantly elevate your Spring and Easter crafts display.
1. Decoupage Floral Easter Eggs: A Classic Spring and Easter Craft
One of my favorite Easter crafts is making decoupage eggs with floral napkins. They look delicate and vintage, almost like something you would find in a little spring market.
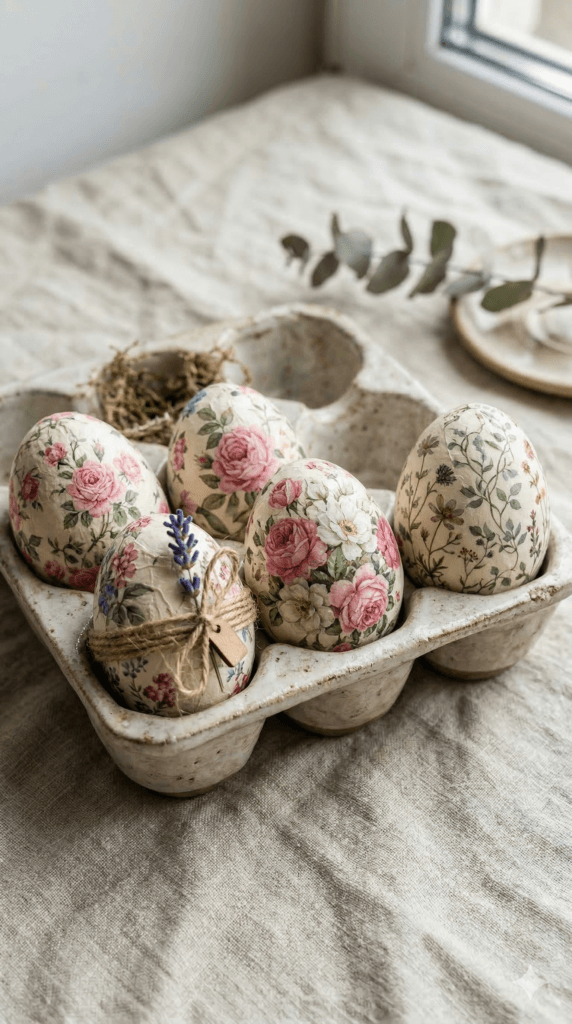
Instead of dyeing eggs with traditional kits, this craft uses decorative napkins to create soft floral patterns on the eggs.
The result is a set of beautiful decorative eggs that look elegant in bowls, baskets, or spring centerpieces.
Decoupage Floral Easter Eggs
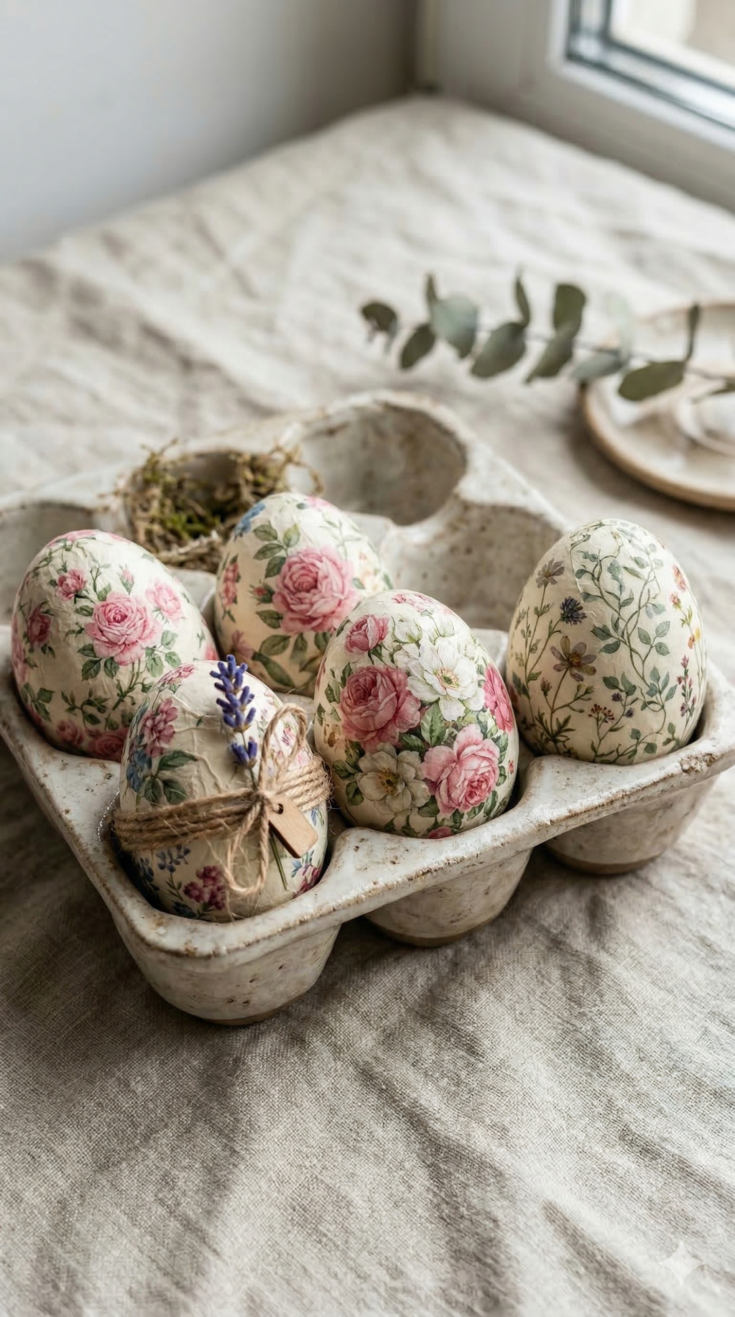
Transform plain craft eggs into vintage-style decor using floral paper napkins and Mod Podge. It’s an easy way to get a high-end 'botanical' look without the mess of traditional dyes.
Materials
- Craft eggs (wood or plastic)
- Decorative paper napkins with floral patterns
- Mod Podge or craft glue
Tools
- Small paintbrush
- Detail Scissors
Instructions
- Separate the printed layer of the floral napkin from the white backing.
- Cut out small floral sections using your detail scissors.
- Brush a thin layer of Mod Podge onto the egg surface.
- Place the napkin pieces gently onto the wet glue.
- Seal with another light coat of Mod Podge over the top.
Notes
For a professional display, style these in a ceramic egg carton on a bed of dried Spanish moss.
Pro-Tip: The Secret to a Wrinkle-Free Finish
“If you’re struggling with wrinkles on the curved surface of the egg, try using a dry, soft-bristle brush to gently ‘tap’ the napkin into place from the center outward. This smooths the paper without tearing it while the glue is still wet!”
🛍️ Shop the Essentials: Decoupage Florals
The must-have supplies for your Spring and Easter crafts to get that perfect vintage look.
As an Amazon Associate, I may earn from qualifying purchases at no extra cost to you. Thank you for supporting HypeVine!
2. Easter Egg Tree Centerpiece
If you want a craft that instantly brightens a room, try making an Easter egg tree centerpiece. It’s whimsical, colorful, and surprisingly easy.
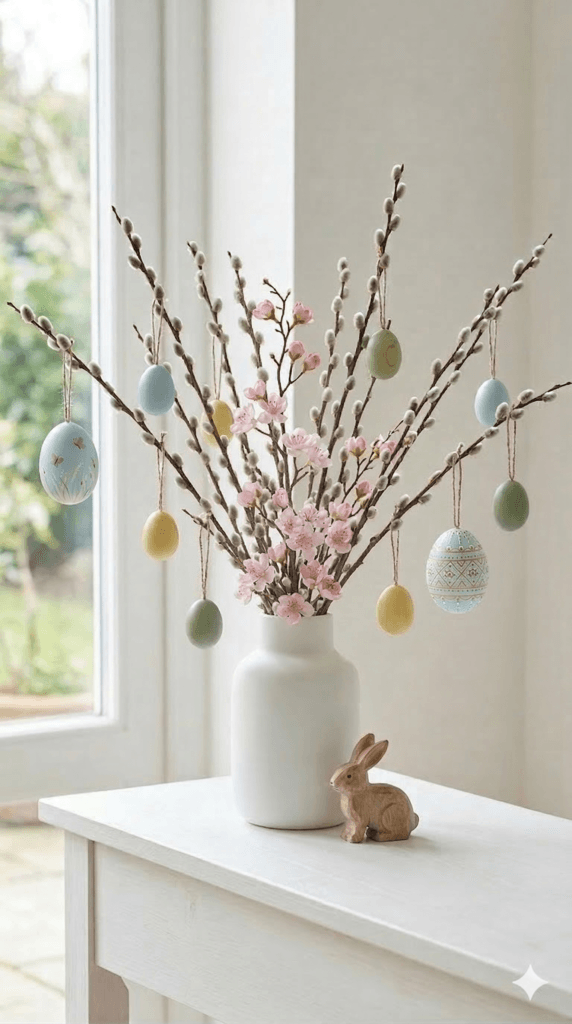
All you need are a few branches and some lightweight eggs, and you’ve got an instant spring centerpiece that feels airy, festive, and easy.
It’s a simple way to create a spring centerpiece that feels festive but still relaxed.
Easter Egg Tree Centerpiece

Bring the outdoors in by hanging mini pastel eggs from Pussy Willow or Cherry Blossom branches. It’s a whimsical, airy focal point that works perfectly for entryways or dining tables.
Materials
- Pussy Willow or Cherry Blossom branches
- Mini hanging Easter eggs
- White marble chips
- Baker's twine
- Dried Spanish moss
Tools
- Ceramic vase or glass jar
- Scissors
Instructions
- Weight the Base: Fill the bottom of your vase or jar with white marble chips. This provides the necessary weight to keep your branches from tipping over once the eggs are added.
- Arrange the Branches: Place your Pussy Willow or Cherry Blossom branches into the vase. Spread them out to create an airy, natural-looking "tree" shape.
- Prepare the Hanging Eggs: If your mini eggs don't have hangers, cut small lengths of baker's twine and tie them in loops through the top of the eggs.
- Hang the Eggs: Carefully hang the eggs on various branch tips, spacing them out evenly so the tree looks balanced from all sides.
- Add the Finishing Touch: Tuck a layer of dried Spanish moss around the base of the branches to hide the marble chips and give the centerpiece a polished, earthy look.
Notes
Pro-Tip: Add a Magical Glow
“To take your centerpiece from day to night, intertwine a strand of warm white fairy lights around the branches before hanging your eggs. It creates a soft, ethereal glow that makes the pastel colors pop after the sun goes down!”
🛍️ Shop the Essentials: Egg Tree Centerpiece
Create a whimsical focal point with these Spring and Easter crafts supplies.
As an Amazon Associate, I may earn from qualifying purchases at no extra cost to you. Thank you for supporting HypeVine!
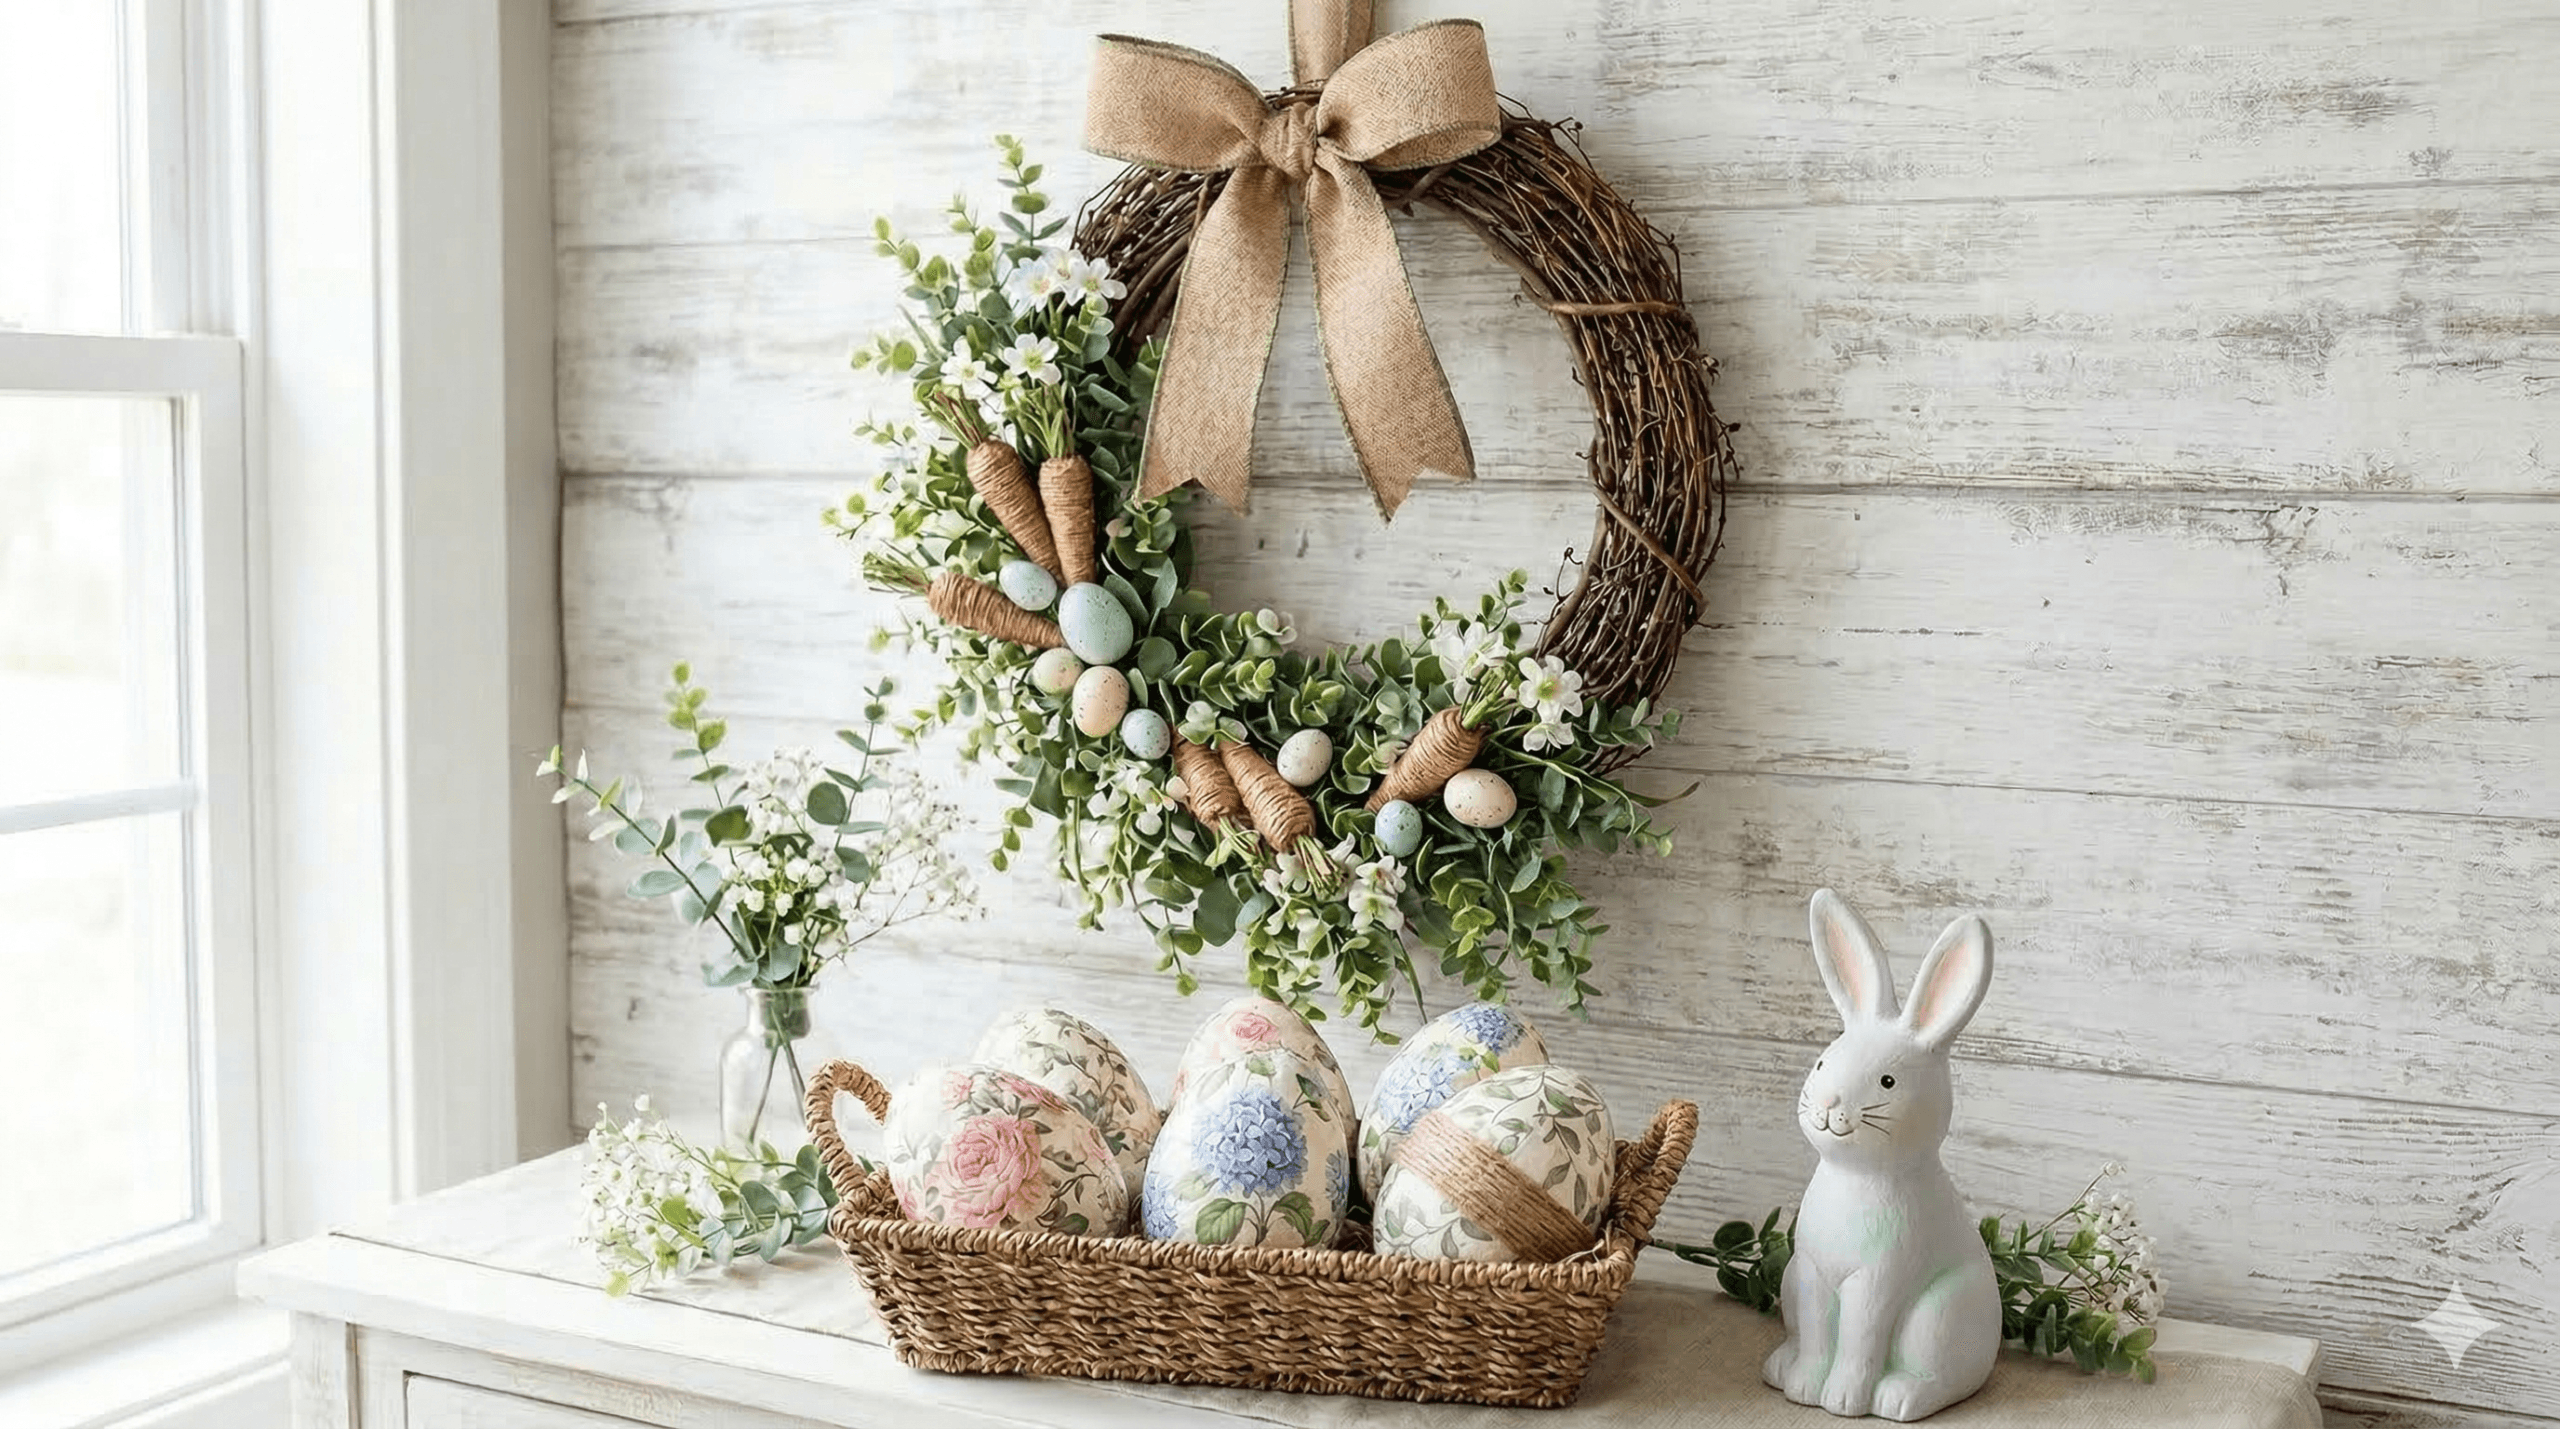
3. DIY Spring Wreath with Carrots and Eggs
A cheerful Easter wreath instantly makes your front door feel welcoming.

This craft uses soft spring colors, faux greenery, and playful seasonal elements like carrots and eggs.
It’s one of those DIY Easter decorations that feels joyful every time you walk past it.
DIY Spring Wreath with Carrots and Eggs
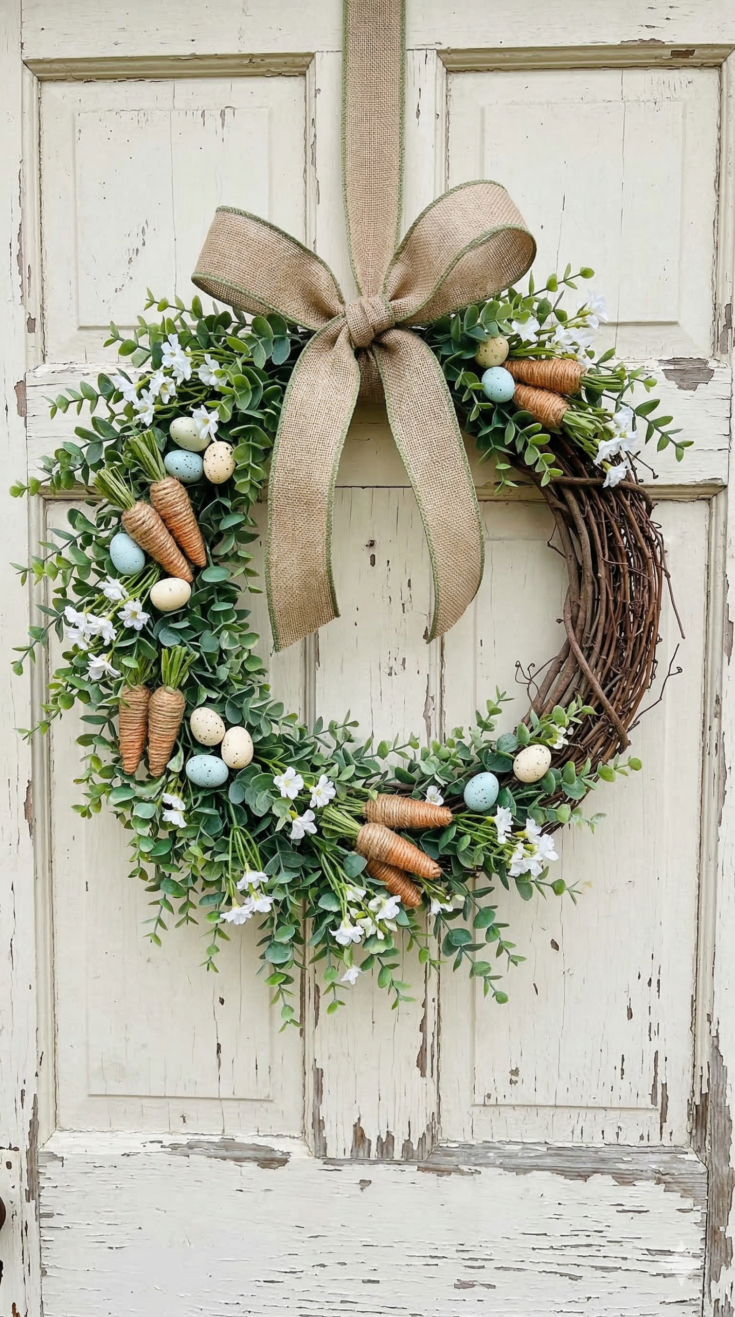
Create a welcoming entrance by layering faux eucalyptus, mini twine-wrapped carrots, and speckled eggs onto a grapevine base. This project adds instant curb appeal and a pop of seasonal color to your front door.
Materials
- 14-inch Grapevine wreath base
- Faux eucalyptus stems
- Mini decorative carrots
- Small speckled craft eggs
- UV-resistant clear floral sealant
Tools
- Hot glue gun and Ribbon for hanging.
Instructions
- Layout: Lay your grapevine base flat and dry-fit your greenery and eggs before gluing to ensure the design is balanced.
- Add Greenery: Weave the faux eucalyptus stems into the grapevine, securing them with small dabs of hot glue.
- Attach Accents: Glue the mini carrots and speckled eggs in small clusters, using them as focal points.
- Seal: Take the wreath to a well-ventilated area and apply a light coat of UV-resistant spray to prevent fading.
- Hang: Once dry (allow 15 minutes for drying and setting), loop a ribbon through the top of the grapevine and tie a bow to hang it on your door.
Notes
If your front door gets direct afternoon sun, don't skip the UV spray! It acts like sunscreen for your crafts and keeps those pastel colors from turning beige by Easter.
Pro-Tip: Balance Your Design
“Before gluing, lay your elements out on the wreath first. Start with the ‘heavy’ items (the eggs) as focal points, then fill the gaps with the lighter greenery. This ensures your wreath doesn’t look lopsided!”
🛍️ Shop the Essentials: Spring Wreath DIY
Welcome guests with handmade Spring and Easter crafts that pop on your front door.
As an Amazon Associate, I may earn from qualifying purchases at no extra cost to you. Thank you for supporting HypeVine!
4. Air-Dry Clay Bunny Decorations
Air-dry clay is wonderful for creating simple handmade Easter decorations. These little clay bunnies look sweet on shelves, trays, or windowsills.
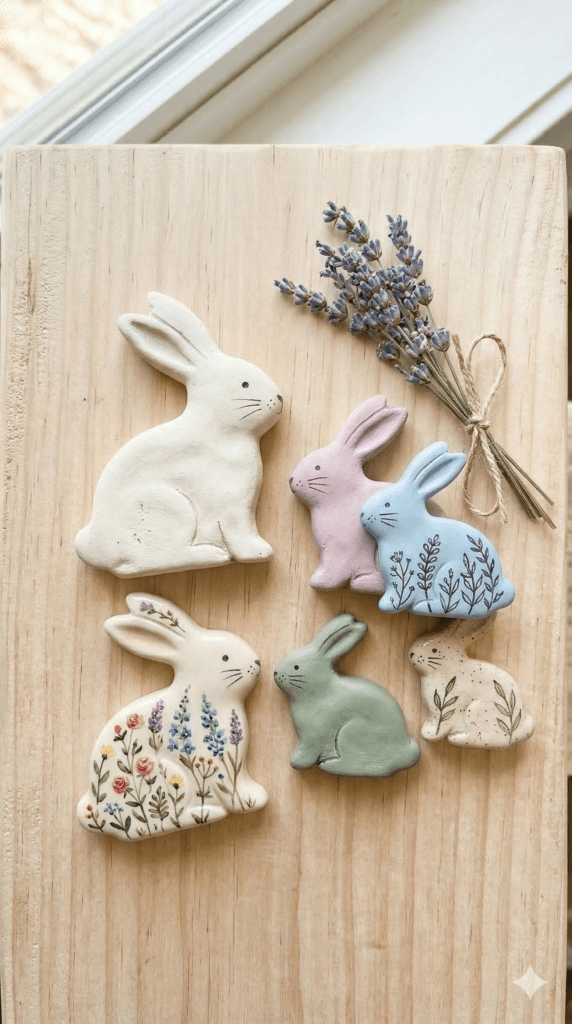
You can keep them neutral for a modern, airy vibe, or paint them in soft pastels to lean more playful and festive.
These little bunnies add a gentle handmade touch to your spring decor.
Air-Dry Clay Bunny Decorations

Use a rolling pin and bunny-shaped cookie cutters to create minimalist, modern clay bunnies. These are perfect for tiered trays or as little 'tucked-in' accents on bookshelves.
Materials
- White air-dry clay
- Pastel acrylic paint set
- Parchment paper
Tools
- Bunny-shaped cookie cutters
- Small wooden rolling pin
- Fine tip paintbrushes
Instructions
- Roll: Roll your air-dry clay flat on a piece of parchment paper until it is about 1/4 inch thick.
- Cut: Use your bunny cutters to press out shapes, removing the excess clay from around the edges.
- Smooth: Dip your finger in water and smooth any rough edges around the sides of the bunnies.
- Dry: Let the bunnies dry for 24 hours. Flip them every 4 hours to prevent the edges from curling upward.
- Paint: Once fully hardened, use pastel paints to add simple faces or leave them white for a minimalist look.
Notes
Flip the bunnies every 4 hours during the 24-hour drying period to prevent the edges from curling upward. If you notice any small cracks, smooth them out with a damp finger—the clay is very forgiving before it fully cures!
Pro-Tip: The “Perfect Surface” Secret
“To get a professional, pottery-store finish, dip your finger in a tiny bit of water and smooth out any ‘fuzz’ or fingerprints before the clay dries. If you find a tiny crack later, don’t worry—a quick dab of wet clay acts just like wood filler!”
🛍️ Shop the Essentials: Clay Bunny Decor
Craft timeless, minimalist Spring and Easter crafts with these essential pottery supplies.
As an Amazon Associate, I may earn from qualifying purchases at no extra cost to you. Thank you for supporting HypeVine!
5. Personalized Easter Basket Tags
Adding a personalized basket tag instantly makes Easter baskets feel extra special.
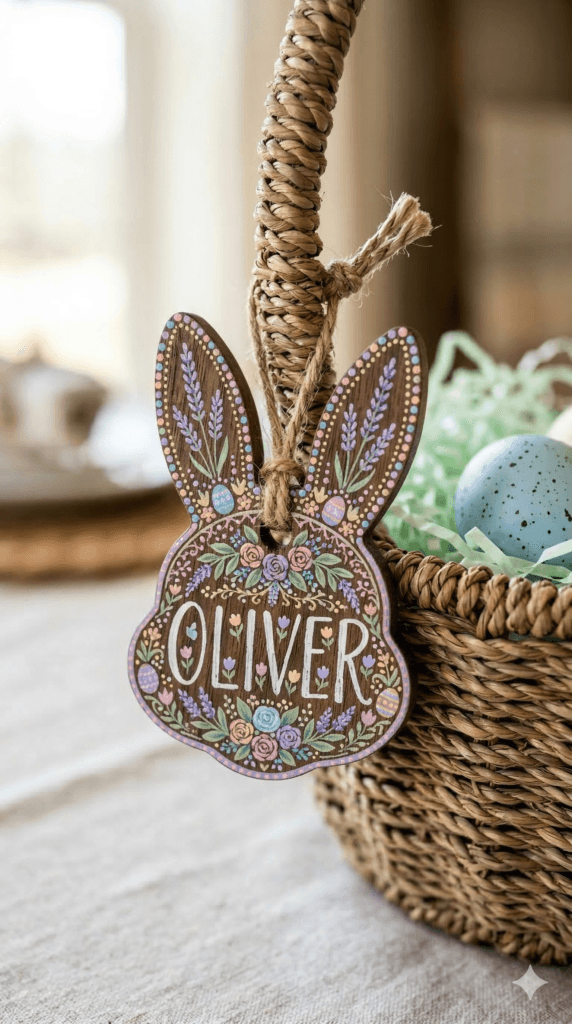
These can be made with cardstock for a crisp, printed look, wood tags for a rustic feel, or air-dry clay for a soft, handmade finish.
Supplies
- Cardstock or wood tags
- Letter stamps or markers
- Ribbon or twine
- Hole punch
How to make them
- Write or stamp each name onto the tag.
- Decorate with small doodles like flowers or bunnies.
- Punch a hole at the top.
- Attach the tag to the basket with ribbon.
Pro-Tip: Use a white paint pen on dark wood tags for a high-contrast, modern farmhouse look. If you don’t have great handwriting, try using alphabet stamps for a charming, stamped-book style.
These tags make baskets feel thoughtful and unique, and they’re a fun craft to do with kids too.
Personalized Easter Basket Tags

Elevate standard Easter baskets with custom wooden or cardstock tags. These add a thoughtful, boutique-style touch to your holiday gifting.
Materials
- Unfinished wooden tags
- Natural jute twine
- Cardstock (optional)
- Fine-grit sandpaper (optional)
Tools
- White paint pen
- Pastel acrylic paint set (optional)
- Alphabet stamps
- Hole punch
Instructions
- Prep the Surface: Wipe your wooden tags with a dry cloth to remove any dust.
- Lettering: Use your white paint pen or alphabet stamps to carefully add a name to the center of the tag.
- Details: Add small hand-drawn doodles, like a tiny heart or a simple flower, around the edges for extra character.
- String: Cut a 6-inch length of jute twine and loop it through the pre-drilled hole.
- Attach: Tie the tag onto the handle of your Easter basket with a simple knot or bow.
Notes
If you make a mistake on a wood tag, a light sanding with fine-grit sandpaper will usually take the paint right off so you can start over!
Pro-Tip: The High-Contrast Secret
“For a high-end look on dark wood tags, use a white extra-fine point paint pen. If you’re nervous about your handwriting, alphabet stamps provide a charming, consistent ‘stamped-book’ style that looks professionally made!”
🛍️ Shop the Essentials: Personalized Tags
Add a thoughtful, custom touch to your Spring and Easter crafts with these tagging essentials.
As an Amazon Associate, I may earn from qualifying purchases at no extra cost to you. Thank you for supporting HypeVine!
Bonus Craft: Egg Carton Chicks Kids Will Love
If you’re crafting with kids this spring, these egg carton chicks are one of the easiest and cutest Easter crafts to try. They use recycled materials and turn something simple into an adorable little decoration.
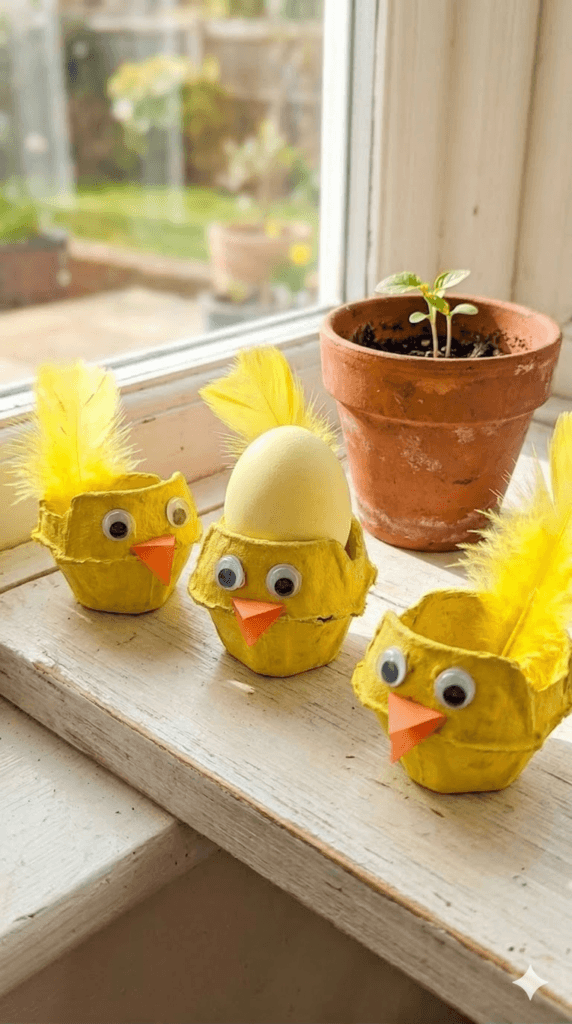
Kids love this craft because it’s colorful, playful, and lets them get creative with silly chick faces and bright feathers.
What you need
- An empty egg carton
- Yellow paint
- Small craft feathers
- Googly eyes
- Orange paper or foam for the beak
- Glue
- Scissors
How to make them
- Cut the egg carton into individual cups.
- Paint each cup bright yellow and let it dry.
- Glue googly eyes onto the front.
- Cut a small triangle from orange paper for the beak and glue it on.
- Add feathers to the back or top of the chick.
Suddenly you have a flock of cute little Easter chicks ready to decorate the house.
Pro-Tip: To make painting easier for little hands, place the egg cup upside down on a disposable chopstick or craft sticks. They can hold the stick while they paint without getting yellow fingers!
Kids can line them up on a windowsill, hide them in Easter baskets, or use them as tiny table decorations for Easter brunch.
🛍️ Shop the Essentials: Egg Carton Chicks
Fun and colorful Spring and Easter crafts supplies for the little creators in your home.
As an Amazon Associate, I may earn from qualifying purchases at no extra cost to you. Thank you for supporting HypeVine!
Master List: 5 Beautiful Spring & Easter Crafts
A quick-reference guide and supply list for all the creative DIY projects in this post. Perfect for planning your seasonal home refresh!
(Approximate for all projects) 2 hours
Decoupage Floral Easter Eggs
Description: Transform plain craft eggs into vintage-style decor using floral paper napkins and Mod Podge. It’s an easy way to get a high-end “botanical” look without the mess of traditional dyes.
Pro Tip: For a professional display, style these in a ceramic egg carton on a bed of dried Spanish moss.
Easter Egg Tree Centerpiece
Description: Bring the outdoors in by hanging mini pastel eggs from Pussy Willow or Cherry Blossom branches. This creates an airy, whimsical focal point for any entryway or dining table.
Pro Tip: Fill the bottom of your vase with white marble chips—it adds necessary weight for stability and looks much cleaner than plain dirt or foam.
DIY Spring Wreath
Description: Create a welcoming entrance by layering faux eucalyptus, mini twine-wrapped carrots, and speckled eggs onto a grapevine base. This project adds instant curb appeal.
Pro Tip: If your front door gets afternoon sun, spray the finished wreath with UV-resistant floral sealant to keep the colors from fading.
Air-Dry Clay Bunny Decorations
Description: Use a rolling pin and cookie cutters to create minimalist, modern clay bunnies. These are perfect for tiered trays or as little “tucked-in” accents on bookshelves.
Pro Tip: The Flip Technique: Flip your bunnies every 4 hours while drying to ensure they dry flat and don’t curl at the edges.
Personalized Easter Basket Tags
Description: Elevate standard Easter baskets with custom wooden tags. Use white paint pens for a modern look or alphabet stamps for a charming, rustic feel.
Pro Tip: Use natural jute twine to tie them on; it perfectly complements the “Modern Farmhouse” aesthetic.
Bonus—Egg Carton Chicks
Description: A playful, eco-friendly craft for kids using recycled egg cartons, yellow paint, and fluffy feathers. It’s a great way to keep little hands busy on a rainy spring afternoon.
Pro Tip: Have the kids hold the egg cup on a disposable chopstick while painting—it makes it much easier to cover the whole surface without getting paint all over their fingers.
📝 The Master Project Shopping List
Everything you need to complete all 5 Spring and Easter crafts!
For the Eggs & Tree
- Wooden or plastic craft eggs
- Floral paper napkins
- Matte Mod Podge
- Pussy Willow/Cherry branches
- Ceramic vase & marble chips
For the Wreath & Tags
- 14″ Grapevine wreath base
- Faux eucalyptus stems
- Mini decorative carrots
- Unfinished wooden tags
- White paint pen & jute twine
Clay & Kids’ Crafts
- Air-dry clay (white)
- Bunny-shaped cookie cutters
- Yellow acrylic paint
- Googly eyes & craft feathers
- Orange foam sheets (for beaks)
Essential Tools
- Detail scissors
- Hot glue gun & sticks
- Small paintbrushes
- Rolling pin
- UV-resistant sealant spray
A Little Spring Craft Inspiration
I hope these spring and Easter crafts inspire you to clear off the dining table and get a little creative this weekend. Whether you’re decorating for a big family brunch or simply celebrating the changing season, these DIYs are a feel-good way to slow down and enjoy the moment.
Bookmark or save this post for later if you’re planning Easter crafts, spring DIY projects, or a family crafting day. A little creativity can make the season feel even brighter. Tap around the blog for more feel-good spring inspiration. 🌸🐰
Looking for more creative projects?
Explore our full collection of handmade decor, seasonal inspiration, and easy tutorials.
Browse More DIY Crafts →