
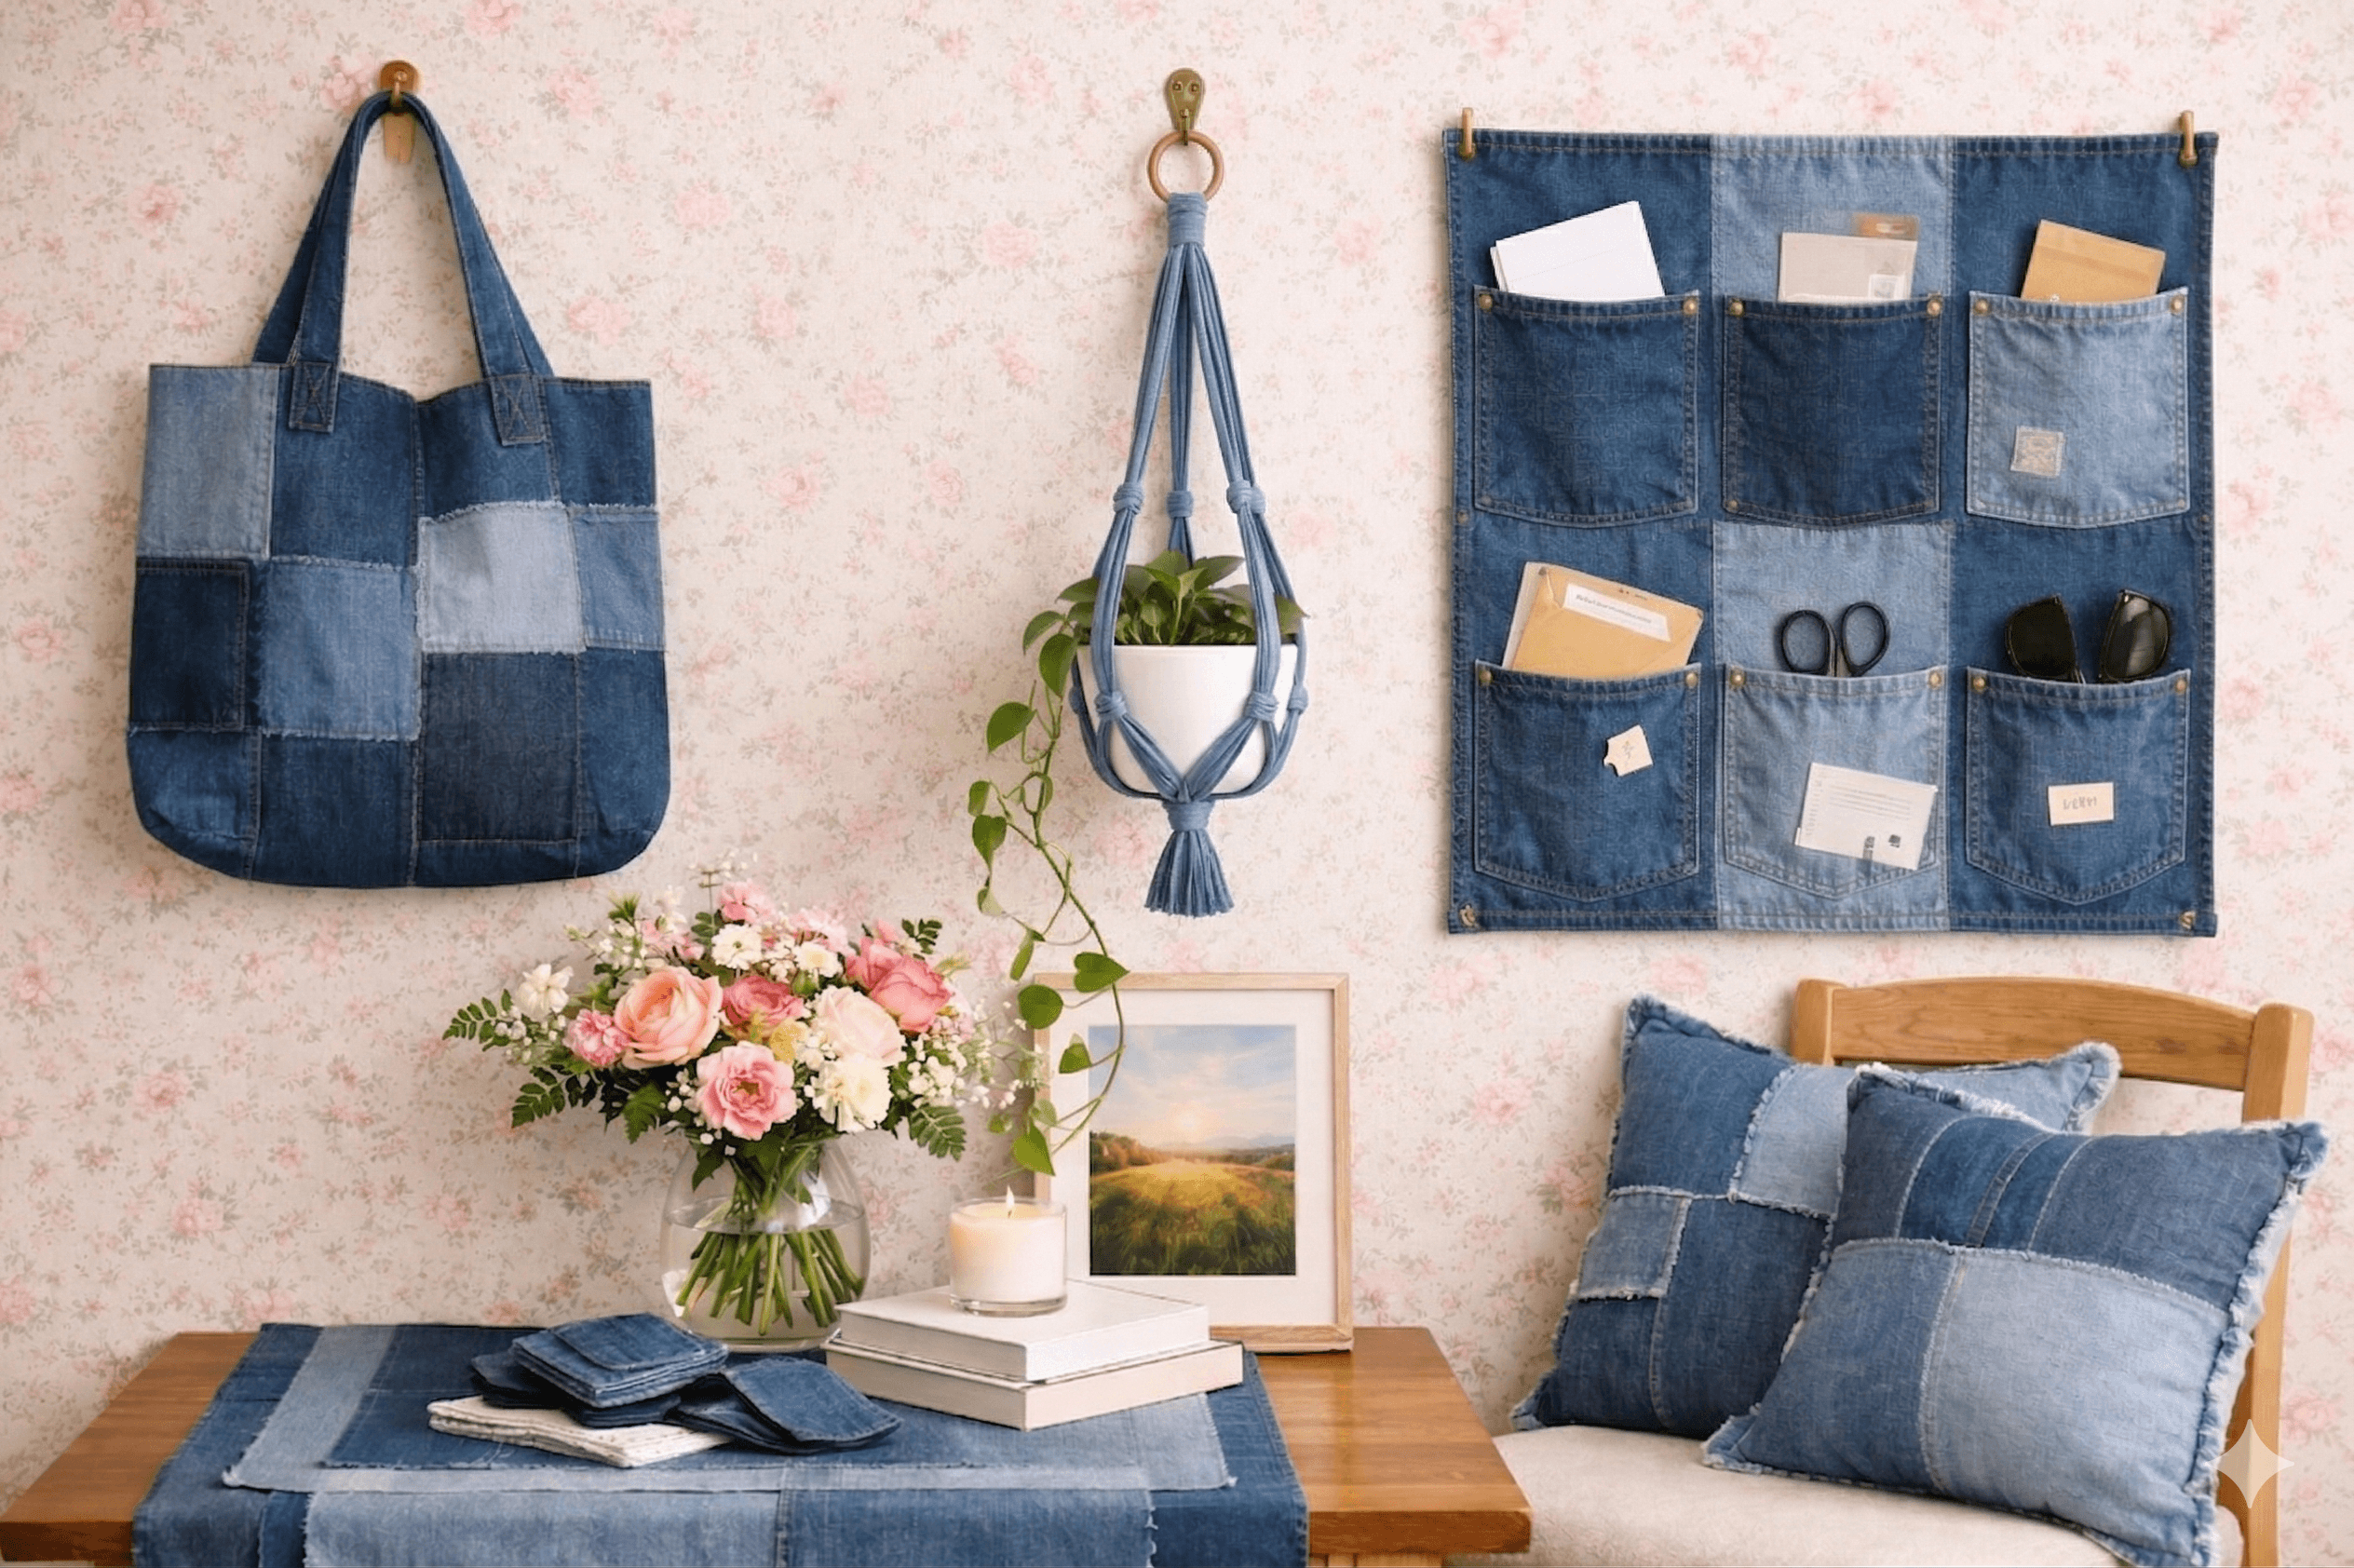
Ready to transform those old jeans into chic, practical decor? These DIY denim crafts prove you don’t need a fancy studio to create something amazing. FYI, you’ll love how fast each project comes together and how good it feels to upcycle.
What would you like to make today?
Click a section below to jump straight to the tutorial.
Sourcing Your Denim
Don’t worry if your own closet is looking a little thin on scrap fabric! You can easily score bulk denim by hitting up thrift store “dollar days” or checking Facebook Marketplace for “free” curb alerts and clothing bundles. You can also put a call out to friends for their heavily distressed or stained pairs—since we’re cutting them up anyway, those “unwearable” jeans are perfect for upcycling!

✂️ No Old Denim? Try These Fabric Squares!
If your closet is empty but your creative heart is full, these 100% cotton denim fat quarters are the perfect shortcut. They come in three classic indigo washes so you can still get that beautiful tonal look!
Indigo Light Denim Fat Quarter (6pcs)
Pre-cut 18″x22″ squares—ideal for the Tote Bag or Wall Organizer.
Check Price on AmazonAs an Amazon Associate, I may earn from qualifying purchases at no extra cost to you.

DIY Denim Crafts: Throw Pillow Covers
Denim brings instant texture and durability to any sofa. These pillow covers are sturdy, versatile, and surprisingly easy to whip up on a weekend afternoon. Honestly, you can finish a pair in under a couple of hours and still have time to relax after.
Why you’ll love them
- Feels rugged yet comfy with the right stuffing
- Works with everything from soft neutrals to bold, layered spaces
- Easy to personalize with pockets, patches, or stitching details
Materials you’ll need
- Old denim jeans (mixing shades adds a nice, natural depth)
- Coordinating fabric for backing (canvas or cotton works well)
- Thread, sewing machine, scissors, ruler
- Optional, decorative buttons, patches, or a zipper for a removable cover

This all-in-one denim sewing kit is such a smart little upgrade if you’re doing heavy-duty upcycling. It comes with a compact sewing machine plus the extras that actually matter for thick fabric, like specialized needles and sharp, high-carbon steel scissors that make cutting through bulky denim seams feel way less annoying. If you’ve ever fought a waistband seam and thought “why is this so hard,” this is the kind of kit that makes the whole project smoother from the start.
If you want to save time (and your hands), this is a great pick to grab before you start your next pair of pillows, tote, or pocket organizer.
How to make them (choose your style)
1. Clean + Classic Denim Pillow Cover
This one feels simple, polished, and easy to mix into any room. It’s a great starting point if you want something timeless that works with almost any decor.
It’s also the quickest to make, just clean lines and soft structure, with denim adding a little texture without feeling busy.
Clean + Classic Denim Pillow Cover
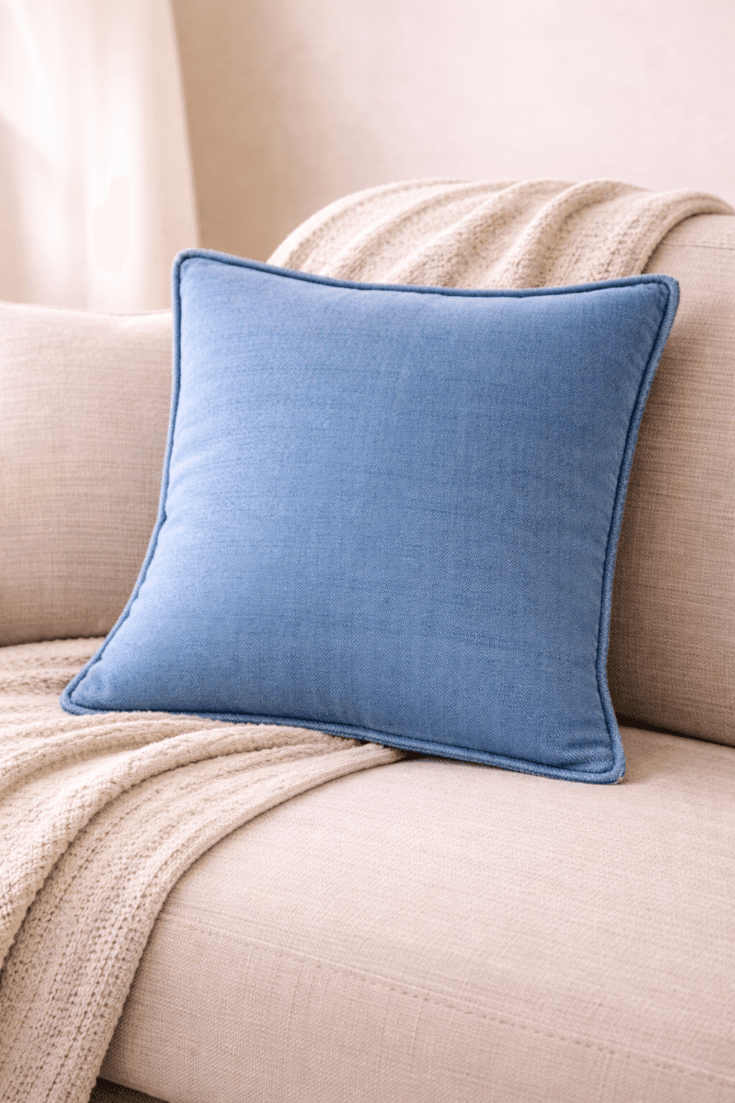
This one feels simple, polished, and easy to mix into any room. It’s a great starting point if you want something timeless that works with almost any decor.
What to Cut- Panel Size: Cut two matching square panels from your denim. Measurement Tip: Measure your pillow insert and add 1 inch to both the width and height (e.g., for an 18" insert, cut 19" squares) to account for seam allowance.
- Denim Weight: Use mid-weight denim for a softer, "lived-in" feel, or thicker denim if you want a more structured, high-end look.
- Pro Tip: If your jeans aren't wide enough for a full square, sew two strips together first to create a "seamed" panel—it adds a great designer detail!
- Prep the Fabric: Place your two panels with right sides together (the "pretty" sides facing each other).
- Sew the Perimeter: Using a heavy-duty needle, sew around the edges with a 1/2-inch seam allowance. Leave a 4-5 inch opening on the bottom edge for turning.
- Clip the Corners: Before turning, snip the excess fabric off the corners (be careful not to cut the stitches!). This helps the corners look sharp and not "bunched up."
- Reveal the Design: Turn the cover right-side out through the opening. Use a dull pencil or chopstick to gently poke the corners out.
- Stuff the Cover: Insert your pillow form or stuffing.
- Final Closure: Fold the raw edges of the opening inward and close it using a "ladder stitch" by hand for an invisible look, or a very close topstitch with your machine.
Optional Detail
Add a light topstitch about 1/4-inch from the edge all the way around. Not only does this look clean and professional, but it also helps the denim lay flat and maintain its shape after washing.
2. Pocket Detail Denim Pillow Cover
This version adds a little personality and function. It’s the kind of piece that feels playful but still practical, especially in living rooms or reading corners.
The built-in pocket is perfect for small everyday items, which makes it feel thoughtful, not just decorative.
Pocket Detail Denim Pillow Cover
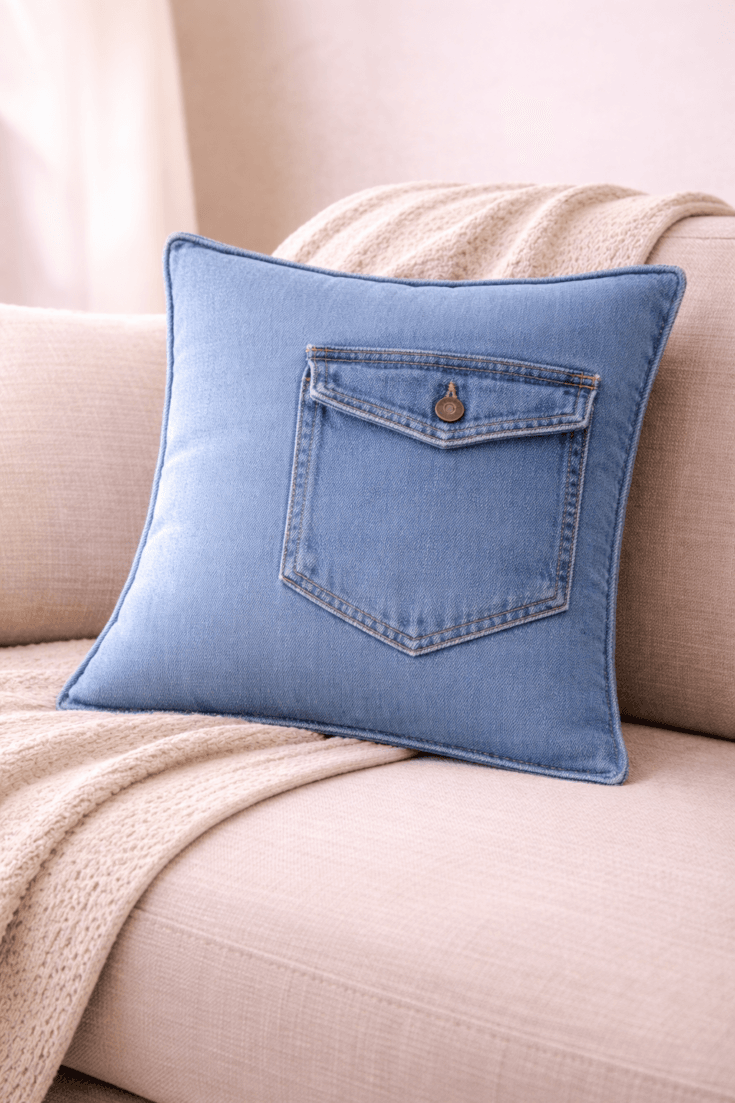
A simple denim pillow cover with a built-in pocket that’s equal parts cute and functional. Easy to make and perfect for everyday living.
What to Cut- The Feature Panel: Cut one square panel from your jeans that includes a back pocket. Placement Tip: Try to center the pocket or offset it slightly to the bottom-right for a more "designed" look.
- The Backing: Cut one matching square from plain denim or a contrasting fabric like a heavy cream canvas.
- Size Check: Ensure you leave at least 2 inches of denim "frame" around the pocket so it doesn't get caught in your seams.
- Pin with Care: Place the pocket panel and backing with right sides together. Make sure the pocket is facing "up" toward the top of your pillow!
- Sew the Perimeter: Sew around all four sides with a 1/2-inch seam allowance. Leave a 5-inch gap at the bottom for stuffing.
- Reinforce Stress Points: When sewing past the thick corners of the pocket, slow down your machine or use the hand wheel to ensure the needle doesn't break.
- Turn and Shape: Turn the cover right-side out. Use a blunt tool (like a knitting needle) to crisp up the corners.
- Finish: Insert your pillow form. Hand-stitch the opening closed using a ladder stitch.
Helpful Tip
Before sewing, slide a small piece of cardboard inside the pocket. This prevents you from accidentally stitching the pocket shut while you are assembling the pillow!
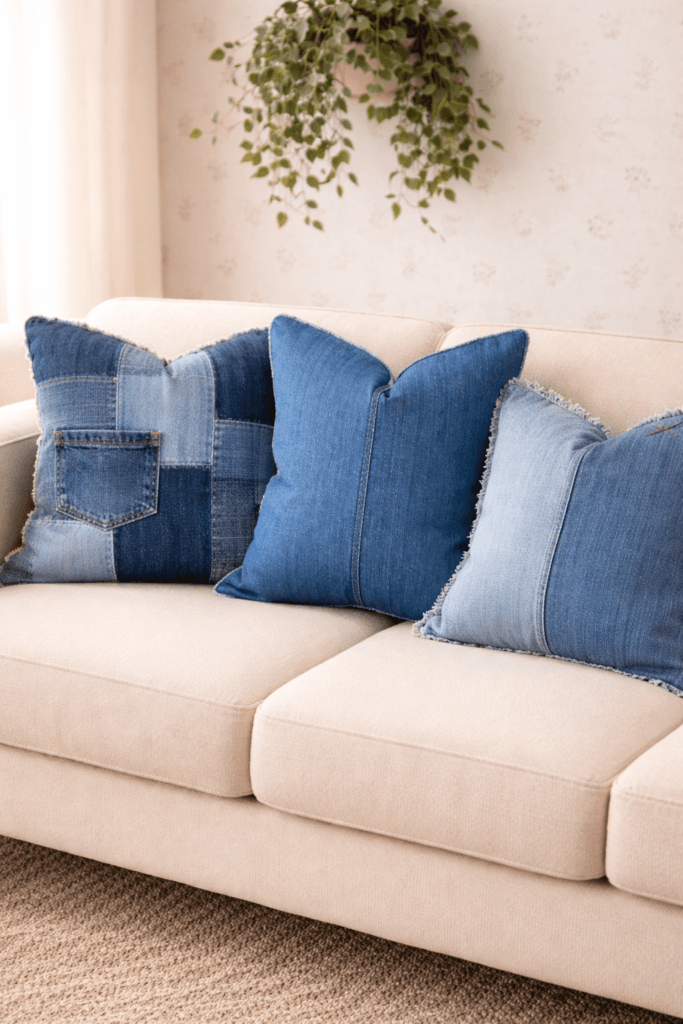
3. Patchwork Denim Pillow Cover
This one has the most texture and feels a little more styled and collected. It’s perfect if you want that relaxed, layered look that feels warm and lived-in.
It’s also a great way to use smaller scraps, so nothing goes to waste.
Patchwork & Layered Denim Pillow
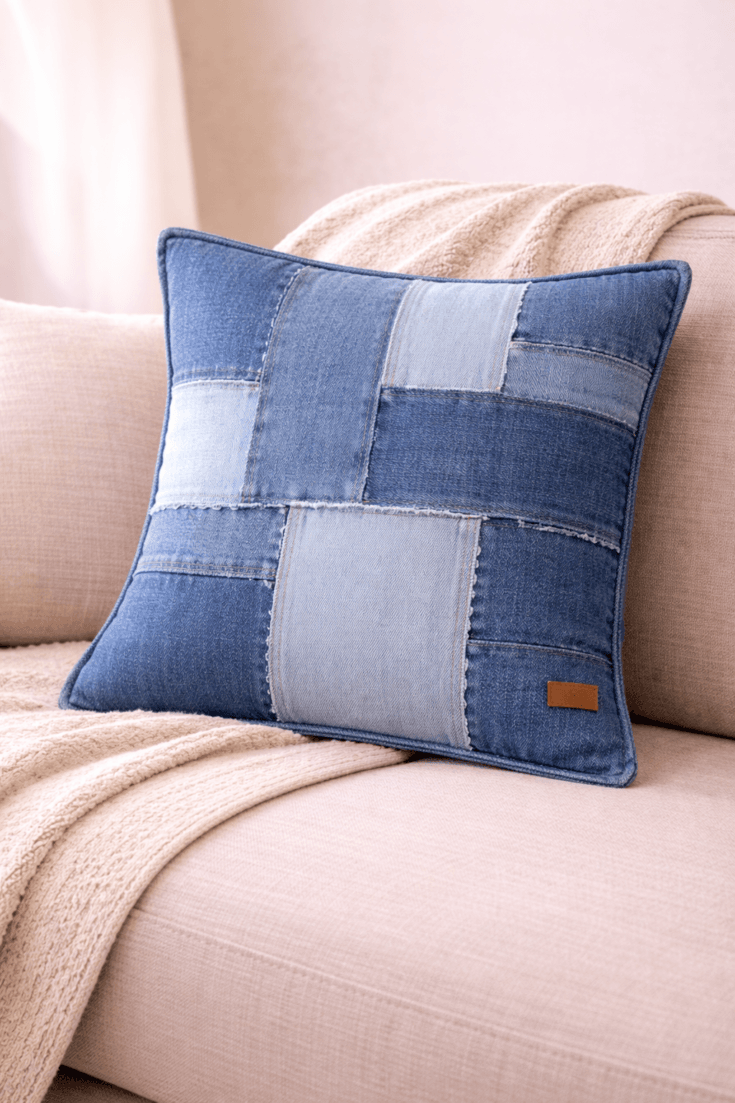
I love this one for that relaxed, layered look that feels a little more styled and collected. It’s a great way to use denim scraps while adding texture and depth to your space.
What to Cut- The Scraps: Cut strips, squares, or random geometric shapes from at least 3 different denim washes (light, medium, and dark).
- The Base: Cut one "foundation" square of scrap fabric or thin muslin to the size of your pillow plus 1 inch. This makes it much easier to sew your patchwork pieces down without the whole thing shifting.
- The Backing: Cut one solid denim square for the back of the pillow.
- Design the Layout: Arrange your denim pieces onto the foundation square until you like the pattern. Pro Tip: Overlap the edges slightly so no foundation fabric peeks through.
- Quilt the Front: Sew the pieces onto the foundation. You can use a standard straight stitch or a "zig-zag" stitch over the raw edges for a more rugged, frayed look.
- Trim to Size: Once the front is fully covered and sewn, trim the edges so it’s a perfect square.
- Assemble: Place the patchwork front and solid back with right sides together. Sew around the edges, leaving a 5-inch opening.
- Turn and Stuff: Turn the cover right-side out, poke the corners sharp, and insert your pillow form.
- Close: Hand-stitch the opening closed with a ladder stitch.
Helpful Tip
To get that "designer" feel, mix the textures as well as the colors. Use a piece with a finished hem next to a piece with a raw, frayed edge. This contrast is what makes these covers look expensive rather than just "homemade."
A quick note
The process is simple overall, cut your panels, stitch them together, and don’t worry about perfection. Denim hides little imperfections beautifully, and that slightly relaxed finish is part of what makes these feel so good in your space.
Styling tip
Keep everything else simple so the texture can stand out. A small vase of fresh flowers, a candle, and a clean stack of dishes is more than enough.
🛋️ Shop the Essentials: Pillow Cover Edition
Create professional-looking DIY denim crafts with the right tools for heavy-duty sewing.
As an Amazon Associate, I may earn from qualifying purchases at no extra cost to you. Thank you for supporting HypeVine!
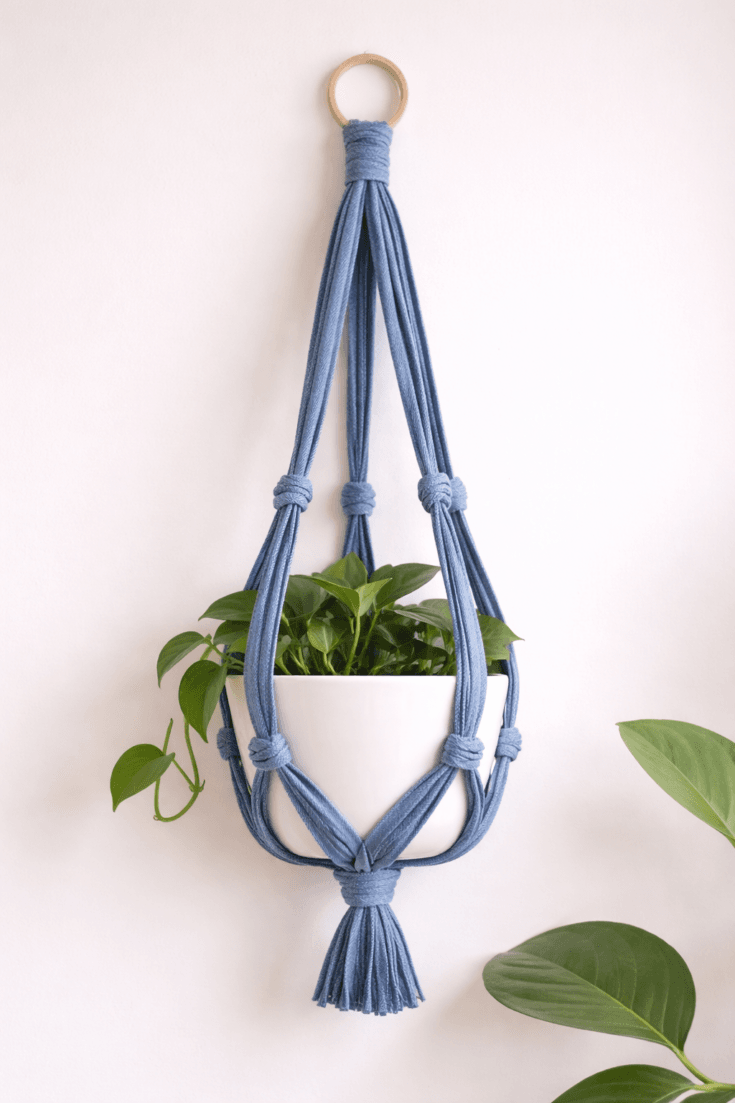
2. Denim Plant Hangers
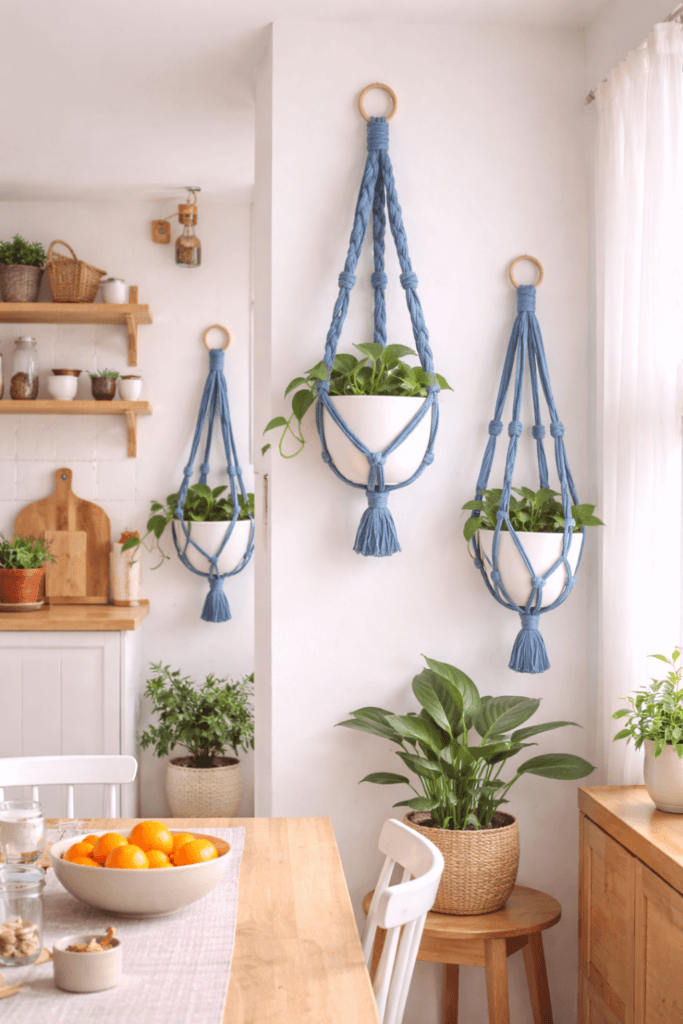
Greenery deserves a home that feels just as thoughtful, and denim plant hangers are an easy way to make it happen. They add texture, a little personality, and instantly make a space feel more styled without doing too much.
What makes them special
- Adds a relaxed, slightly boho feel without looking overdone
- Feels sturdy and secure when knotted properly
- Turns old jeans into something actually useful
- These also make a thoughtful, handmade gift for plant lovers.
What you’ll need
- Old jeans with sturdy seams (the thicker the better)
- Jute or cotton cord (about 6–8 feet per hanger)
- Scissors, needle, fabric glue (optional for sealing ends)
- A pot or planter to measure your length
How to make them (choose your style)
1. Simple knot hanger (clean + minimal)
This one feels light, simple, and works in almost any space. It’s the kind of project you can make in one sitting and immediately hang up, no overthinking required.
You can keep it super minimal, or use mixed denim tones for a subtle layered look. Either way, it blends in beautifully while still adding texture.
Simple Knot Denim Plant Hanger
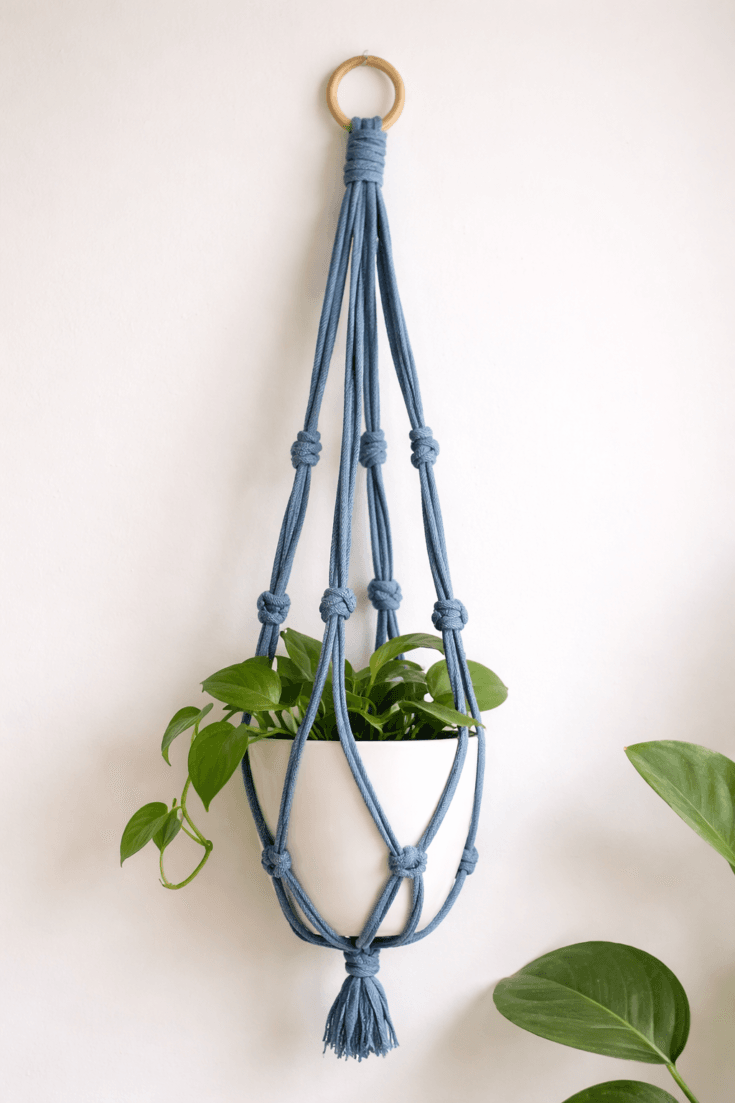
This is the easiest of the three and has that clean, understated look. It feels light, simple, and works in almost any space.
What to Cut- Cut 6–8 long denim strips (about 1 inch wide). Aim for 60–70 inches in length to allow plenty of room for knotting.
- Tip: Cut from the long outer seams of the jeans for the most strength.
- Try to keep lengths even so the hanger sits balanced.
- Anchor the Base: Gather all strips together and tie a very secure overhand knot at the bottom, leaving a 3-4 inch "tassel" at the end.
- Create the First Tier: Separate the strips into pairs. About 3 inches above your base knot, tie a simple knot in each pair.
- Cross-Connect (The Basket): Take one strip from a pair and tie it to one strip from the neighboring pair about 3 inches higher. This creates the "mesh" that holds the pot.
- Final Support: Continue upward with one more row of knots if your pot is tall.
- Test the Fit: Gently open the sections and place your pot inside. Ensure the base knot is centered directly under the bottom of the pot.
- Secure the Top: Bring all the top ends together. Tie a large loop knot or wrap them securely around a metal craft ring.
Helpful Tip
Before tightening your final knots, adjust each section so the pot sits level. If you're using a heavy ceramic pot, double-knot the base to ensure the denim doesn't shift over time as the fabric settles.
2. Braided hanger (a little more texture)
This one adds a bit more detail and movement while still keeping things easy and approachable. The braids bring in texture and give it that softly styled, handmade feel that instantly elevates your plant corner.
You can also play with contrast here, try mixing light and dark denim strips for a subtle dimensional effect, or keep it all one tone for a cleaner look.
Braided Denim Plant Hanger
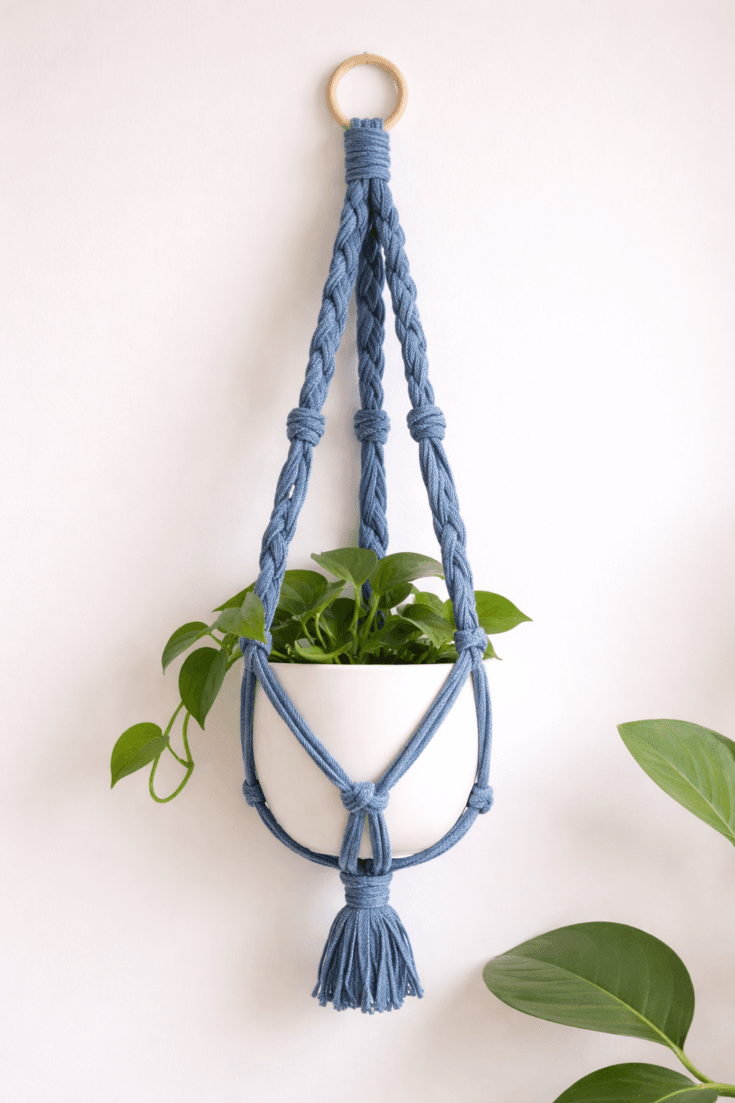
This version adds a bit more detail and movement, while still keeping things easy and relaxed. The braids give it that handcrafted feel that instantly elevates your space.
What to Cut- Cut 9 long denim strips (approx. 1 inch wide).
- Length Tip: Cut these at least 80 inches long. Braiding "consumes" more length than simple knots, so you'll need the extra lead.
- Try to use strips with consistent thickness for the smoothest braid.
- Group and Anchor: Divide your 9 strips into three groups of three. Tie all 9 together at the top with a temporary scrap piece of denim to hold them steady while you work.
- The Three Braids: Braid each group of three strips tightly. You should end up with three thick denim braids.
- The Base Connection: Tie a large, secure knot at the bottom of the three braids to form the base where the pot will sit.
- Create the Cradle: About 4 inches above the base knot, separate the strands of the braids slightly and "cross-connect" them with small, strong knots to create a basket shape.
- Secure the Top: Bring the three main braids back together at the top and tie a permanent heavy-duty knot. You can loop this over a wooden dowel or a metal ring.
- Finishing Touch: Remove the temporary scrap from step 1 and trim your bottom "tassel" so the edges look intentional and frayed.
Helpful TipWatch your tension! Try to keep the braiding pressure even across all three sections. If one braid is tighter than the others, your plant hanger will hang at an angle. If it looks crooked, give the shorter braid a firm tug to stretch the denim fibers slightly.
3. Loop cradle (more structured look)
This one feels more polished and holds its shape really well, like your plant is sitting in a soft, supportive sling.
It’s great if you want something a bit more intentional while still keeping that relaxed, handmade feel.
The process is flexible, build your base, adjust as you go, and add a small detail like a wooden bead or wrapped knot for a finished touch.
Loop Cradle Denim Plant Hanger
This one feels a little more polished and supportive, like your plant is sitting in a soft little sling.
What to Cut- The Main Loop: Cut one long, continuous strip from the outer side seam of your jeans (about 2 inches wide and 50–60 inches long). This acts as your main "suspension."
- The Cradle Strips: Cut 2–3 shorter strips (about 12–15 inches long). These will form the "seat" for your pot.
- Optional: Repurpose a section of the waistband as the top hanging loop for extra durability.
- Form the Primary Loop: Take your longest strip and create one large continuous circle by sewing or knotting the ends together.
- Position the Base: Lay the circle flat on a table. Place your 2–3 shorter "cradle strips" horizontally across the bottom third of the loop, spaced about 2 inches apart.
- Secure the "Sling": Stitch or tie the ends of the short strips to the main side-seam loop. This creates a "ladder" or cradle that the pot will sit on.
- Balance the Weight: Fold the main loop in half upward so the "ladder" is at the bottom.
- The Top Bind: Gather the two top points of the loop and wrap them tightly with a contrasting scrap of denim or a piece of jute cord to create a handle.
- Insert the Pot: Slide your pot into the center of the cradle. The side seams of the main loop should hug the sides of the pot perfectly.
Helpful Tip
To make this look truly intentional, use the flat-felled seams (the thick, double-stitched part of the jeans) for the main side loop. Not only does it look high-end, but it also has zero stretch, so your plant won't "sink" over time.
Care tip
Denim holds up really well in humidity, so it’s a great option for kitchens or bathrooms. Just make sure your knots stay tight, especially after watering.
Pick your favorite style and try one this week. It’s one of those small projects that instantly makes your space feel more styled.
🌿 Shop the Essentials: Plant Hanger Edition
Everything you need to jumpstart these DIY denim crafts and bring a little cozy greenery to your space.
As an Amazon Associate, I may earn from qualifying purchases at no extra cost to you. Thank you for supporting HypeVine!
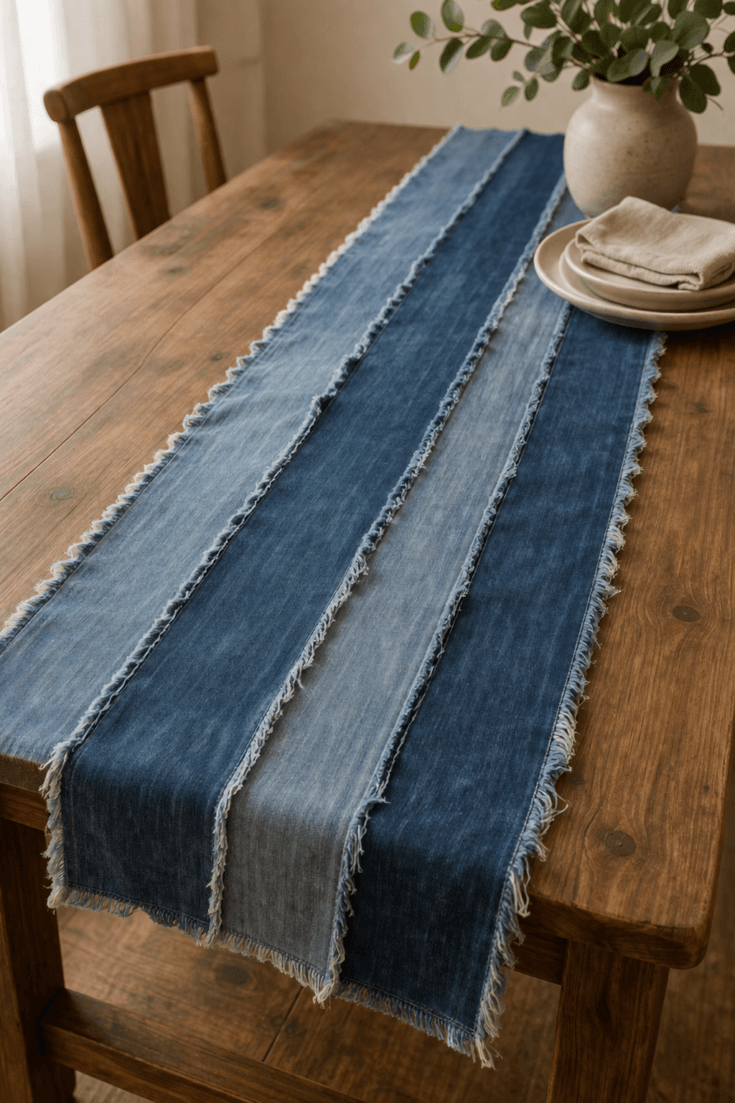
3. Denim Table Runner (Layered Panels)
These table runners instantly makes your table feel styled without doing much at all. They add texture, depth, and that relaxed, pulled-together look that makes even a simple meal feel a little more special.
What makes them standout
- Layered panels create visual interest without needing perfect sewing
- Mixing light and dark denim gives it that elevated, high-end feel
- Works for everyday meals but still feels special enough for gatherings
Materials at a glance
- Several pairs of old jeans (different shades make it more interesting)
- Liner fabric or a simple backing (ecru or neutral works beautifully)
- Thread, scissors, fabric glue (optional), rotary cutter
How to make it (choose your style)
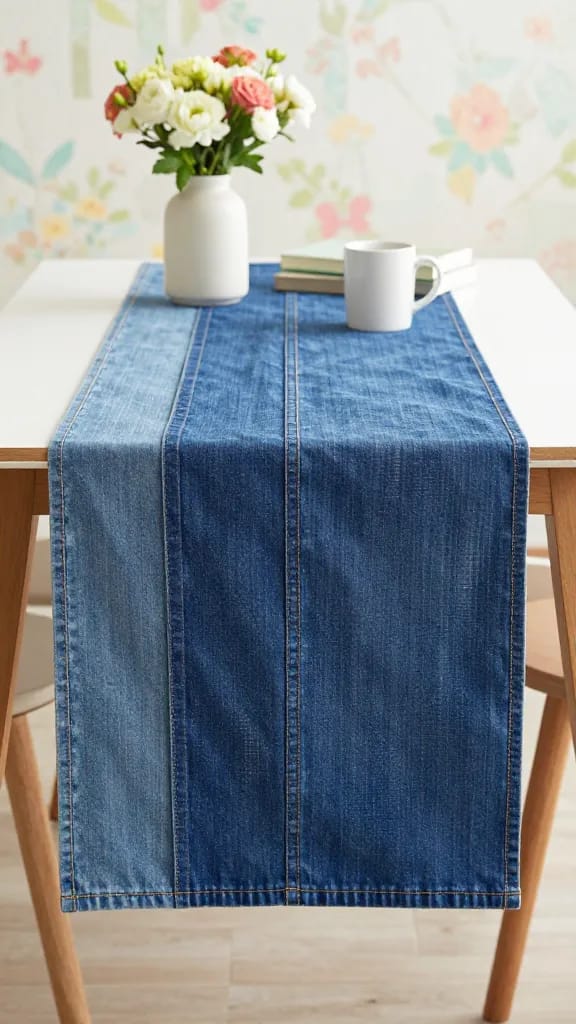
1. Clean panel runner (simple + modern)
This is one of the simplest options to make, just straight panels and clean lines, so it’s perfect if you’re just getting started.
Clean Panel Denim Table Runner (Simple + Modern)
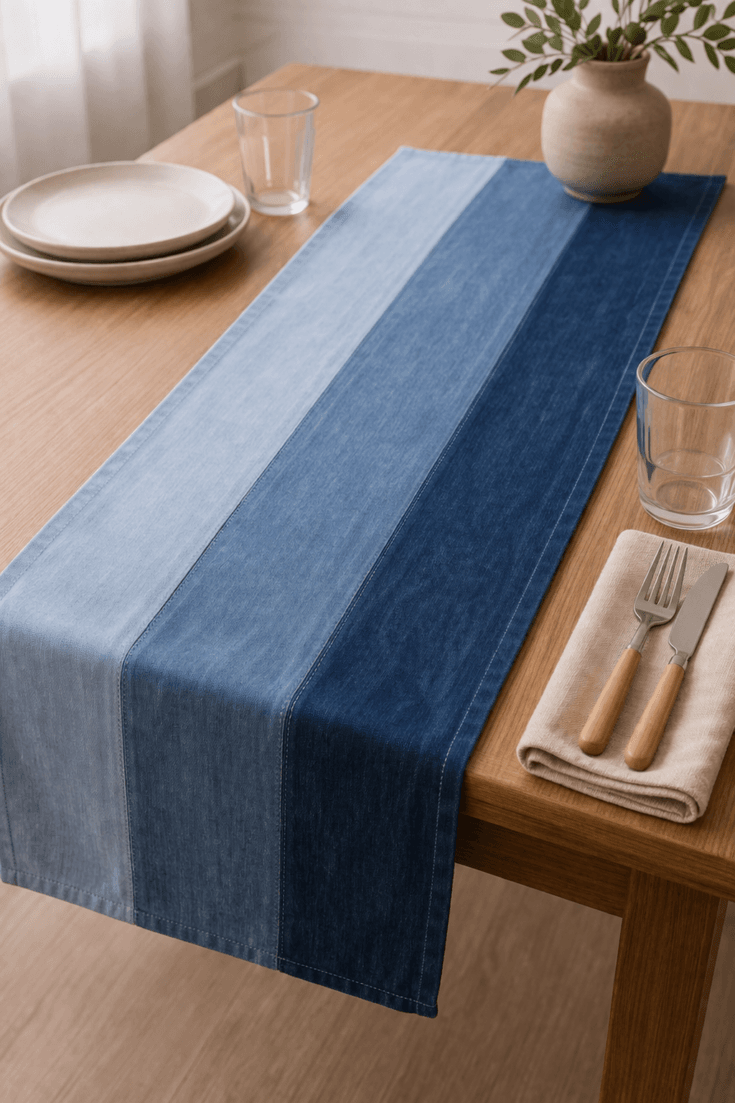
This one feels minimal, relaxed, and really easy to style. I love it for a clean, modern table where you still want a little texture without anything feeling busy.
What to Cut- The Panels: Cut long, even denim strips in similar widths (3–4 inches wide works beautifully).
- Measurement Tip: Aim for a total length that is 12 inches longer than your table so you get a nice 6-inch "drop" on each side.
- Tonal Mix: Select a variety of light, medium, and dark denim scraps to create a soft, gradient effect across the runner.
- Arrange the Ombré: Lay your panels side by side. Experiment with the arrangement—moving from darkest on the outside to lightest in the center creates a high-end, intentional look.
- Join the Strips: Place two panels right sides together and sew along the long edge. Repeat until all panels are joined into one wide runner.
- The "Pro" Press: Use a steam iron to press your seams open and flat on the back. This is the secret to making the runner sit perfectly flat on your table without bunching.
- Square the Ends: Trim the short ends so they are perfectly even.
- The Final Hem: Fold the outer edges over by 1/2 inch and sew a clean perimeter stitch to create a neat, professional border.
Helpful Tip
For a truly modern look, use a contrasting topstitch thread (like a bright white or classic copper) and sew a second line of stitching 1/4 inch away from your seams. It mimics the look of high-end denim tailoring!
2. Layered staggered panels (soft + dimensional)
This one feels relaxed, a little artistic, and full of texture. I love it when you want something that looks styled and layered without feeling too structured.
It’s one of those pieces where imperfect actually looks better, so you can really relax into it and have fun with the layout.
Layered Staggered Denim Table Runner
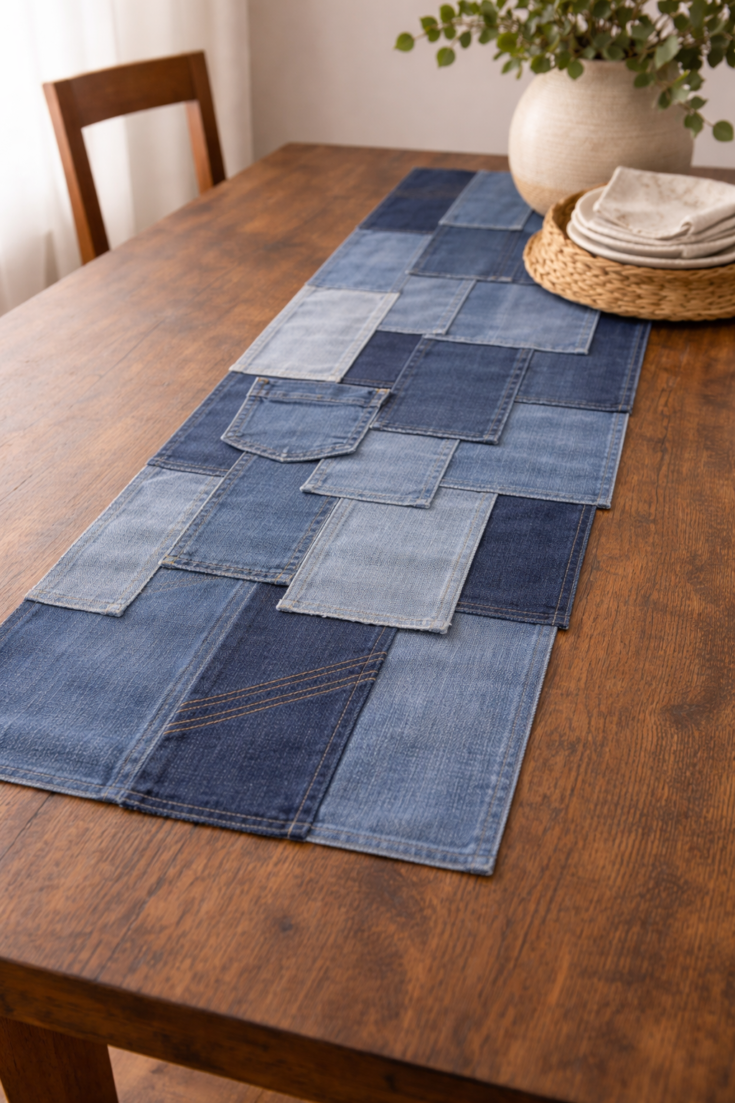
This table runner has that easy, lived-in look where nothing is perfectly lined up, and that’s exactly what makes it feel special.
What to Cut- The Patchwork Pieces: Cut denim panels in a mix of widths (3–6 inches) and lengths.
- Washes: Use at least three different denim washes (light, medium, and dark) to ensure the overlapping layers actually "pop" against each other.
- The "Character" Pieces: Include a few strips that feature original flat-felled seams or pockets for added visual interest.
- Prepare the Foundation: Start with a long base layer. You can use a single long denim strip or two wide panels sewn side-by-side to create the "anchor" for your runner.
- The Staggered Layout: Begin laying your additional panels on top of the base. Shift the pieces horizontally and vertically so the edges don't line up.
- Create Depth: Overlap the panels significantly (at least 2 inches). This "staggered" effect is what gives the runner its weight and dimensional feel.
- Secure the Design: Once you are happy with the collage, use fabric clips rather than pins—denim layers can get too thick for standard pins to hold accurately.
- Final Assembly: Stitch around the perimeter of each top panel to secure it to the base. If you prefer a no-sew version, apply a generous amount of permanent fabric glue to the underside of each piece, focusing on the edges.
Helpful Tip
To get that "designer" look, try diagonal stitching on one or two of the top panels. It breaks up the vertical lines of the runner and makes the patchwork feel more modern and custom-made.
3. Raw-edge runner (casual + textured)
This one feels relaxed, a little undone, and full of texture. I love it for everyday tables where you want something easy, slightly rustic, and still really beautiful.
The frayed edges are what make it special, it gives that soft, lived-in feel without needing perfect seams or structure.
Raw-Edge Denim Table Runner
Don’t overthink this one. Lay everything out, move pieces around, and go with what feels balanced to your eye.
What to Cut- The Panels: Cut 3–5 long denim strips. For a standard table, strips about 4–6 inches wide work best.
- The "Wash" Strategy: Use a mix of tonal shades (like medium indigo and light wash) to create a soft, ombre effect.
- Intentional Edges: Since you aren't hemming, use a rotary cutter and a straight edge for your initial cuts to ensure the fraying starts from a perfectly straight line.
- Alignment: Lay your panels side-by-side. For a "relaxed" look, offset the short ends by 1–2 inches so the runner doesn't have a rigid rectangular shape.
- Joining the Sections: Overlap the long edges by about 1/2 inch and sew a straight line right down the center of the overlap. This leaves the edges of each strip exposed to fray.
- Reinforcement: Sew a "stay-stitch" (a simple straight line) about 1/4 inch in from all outer raw edges. This acts as a "stop sign" for the fraying so your runner doesn't eventually fall apart in the wash.
- The Manual Start: Use a large needle or a seam ripper to gently pull the horizontal threads away from the vertical ones along all exposed edges.
- The "Magic" Step: Toss the completed runner into the wash on a cold, gentle cycle and then tumble dry on low. The agitation of the machine will blossom those raw edges into a soft, beautiful fringe.
- Grooming: Once dry, trim any "rogue" long threads with fabric scissors to keep the fringe uniform.
Helpful Tip
To lean into the rustic look, use a heavy-duty variegated thread in shades of cream or tan. It blends beautifully with the white "weft" threads of the denim that appear once you start the fraying process.
Styling tip
Keep everything else simple so the texture can stand out. A small vase of fresh flowers, a candle, and a clean stack of dishes is more than enough.
🍽️ Shop the Essentials: Table Runner Edition
Everything you need to create these textured DIY denim crafts and elevate your dining space.
As an Amazon Associate, I may earn from qualifying purchases at no extra cost to you. Thank you for supporting HypeVine!
4. Denim Wall Organizer (Pocket Panel)
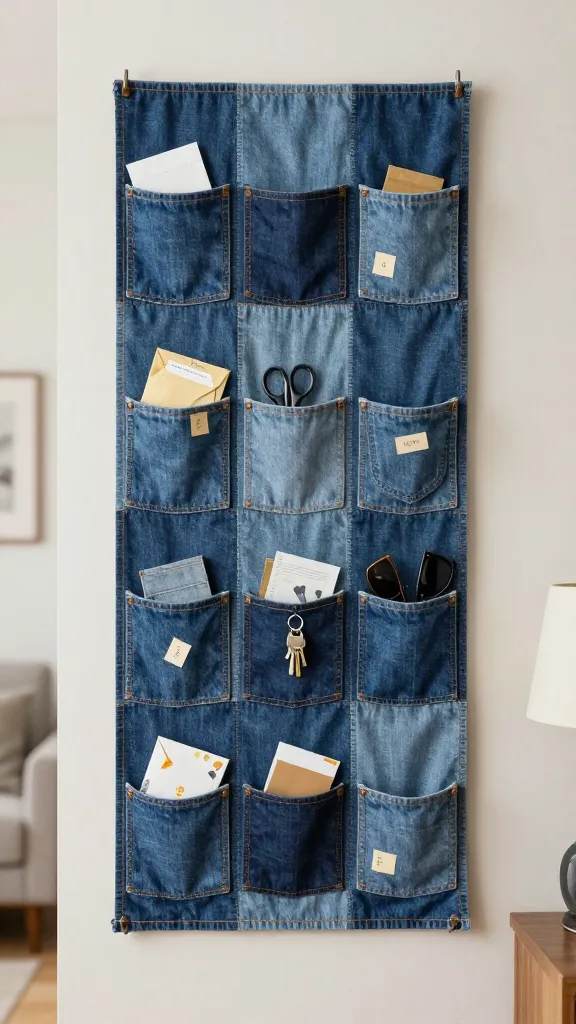
Turn those old jeans into something that feels both useful and a little bit styled. A denim wall organizer with pockets keeps everyday items within reach while adding texture and personality to your space. It’s practical, but it also feels like a small design moment.
Why this is a win
- Makes use of vertical space without adding clutter
- Keeps everyday essentials visible and easy to grab
- Fully customizable depending on your space and what you need
What you’ll need
- Old jeans with intact pockets (the more variety, the better)
- A sturdy backing fabric or curtain liner
- Cardboard or thin plywood for support
- Screws, nails, or a hanging rod
- Sewing supplies or fabric glue
How to make it
Denim Pocket Panel Wall Organizer
This project turns a collection of mismatched pockets into a streamlined, functional piece of wall art.
What to Cut- The Backing: Cut one large rectangular piece of heavy denim or canvas fabric (roughly 18" x 24").
- The Pockets: Harvest 6–9 pockets from old jeans. Cut them out leaving a 1/4-inch denim border around the original finished seams.
- The Channel: Cut a 3-inch wide strip of denim the same width as your backing to create the hanging sleeve.
- The Layout: Lay your backing flat and arrange the pockets in a 3x3 grid. Use a ruler to ensure the spacing between pockets is even.
- Securing: Pin or use fabric wonder clips to hold them in place. Sew around the side and bottom "border" of each pocket, keeping the top open.
- The Top Sleeve: Fold your 3-inch strip over the top edge of the backing and sew a straight line across to create a "tunnel."
- Support: Slide a wooden dowel through the sleeve and tie a piece of twine to each end for hanging.
Helpful Tip
When sewing the Wall Organizer, use heavy-duty thread in a contrasting color (like gold or copper) to mimic the classic look of original denim jeans!
Where to use
- Entryway for mail, keys, and sunglasses
- Near a desk for notebooks, scissors, and small tools
- In a craft room, closet, or bedroom for accessories
Styling tip
Keep what you place inside it simple and slightly color-coordinated. A few papers, a notebook, maybe a pair of sunglasses, it keeps the look clean while still feeling lived-in.
🖇️ Shop the Essentials: Wall Organizer Edition
Get organized with these DIY denim crafts essentials. Perfect for tidying up your entryway or creative workspace!
As an Amazon Associate, I may earn from qualifying purchases at no extra cost to you. Thank you for supporting HypeVine!
5. Patchwork Denim Tote Bag
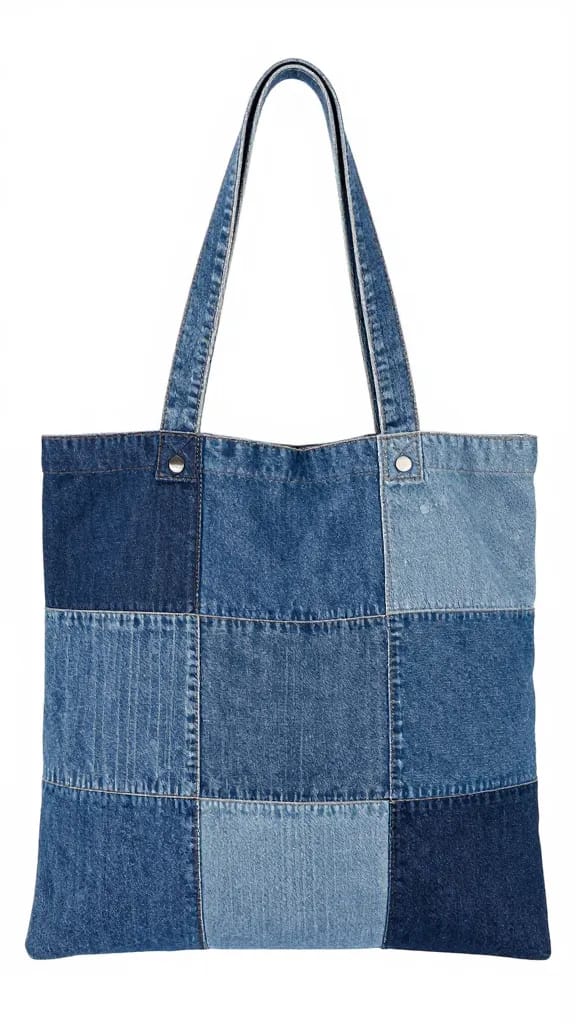
A patchwork denim tote is one of those projects that feels creative but still completely practical. It’s sturdy, roomy, and just a little bit personal, since no two versions ever turn out the same. It’s the kind of bag you end up reaching for every day.
What makes it so appealing
- Durable enough for everyday use, but still feels styled
- A great way to use up denim scraps that don’t match
- Easy to customize with pockets, lining, or stitching details
What you’ll need
- Assorted denim scraps or old jeans
- Strong interfacing or lining fabric
- Heavy-duty thread, needle or sewing machine, scissors
- Leather or cotton straps (or repurpose handles from an old bag)
How to make it
Once your panels are ready, sew the front and back together, reinforce the bottom corners, and add your lining. Attach straps securely and finish with a topstitch for strength.
The process is flexible, lay everything out first and adjust until it feels balanced. It doesn’t have to be perfect to look intentional.
Tonal Patchwork Tote Bag
This project turns random denim scraps into a sturdy, high-end accessory that feels both artistic and intentional.
What to Cut- The Squares: Cut 16 squares (6" x 6") of denim. For an elevated look, use two shades—8 medium wash and 8 dark wash.
- The Lining: Cut two large rectangles (roughly 12" x 16") from canvas fabric.
- The Straps: Cut two 25-inch lengths of cotton webbing.
- Piecing the Panels: Sew your squares into two 4x4 grids. Press your seams flat with an iron so the bag lays perfectly smooth.
- The Body: Place the two denim grids "pretty sides" together. Sew along the left, right, and bottom edges using a heavy-duty needle.
- Box the Corners: Pinch the bottom corners into a triangle and sew a straight line 2 inches from the tip. This gives the bag a flat bottom so it can stand up on its own!
- The Finish: Insert your lining, fold the top edges inward, and sandwich your straps between the denim and lining. Sew a final reinforcing "topstitch" around the entire top rim.
Helpful Tip
For the Tote Bag, use fabric wonder clips instead of pins. Denim layers get very thick, and clips will save your fingers from getting poked while keeping your patchwork perfectly aligned!
Pro tip
Add one small outer pocket or a simple inner pocket for your phone or keys. It’s such a small detail, but it makes the bag feel even more functional.
👜 Shop the Essentials: Patchwork Tote Edition
Durability meets style. Grab these essentials to ensure your DIY denim crafts stand the test of time.
As an Amazon Associate, I may earn from qualifying purchases at no extra cost to you. Thank you for supporting HypeVine!
6. Denim Coasters (Quilted or Raw Edge)
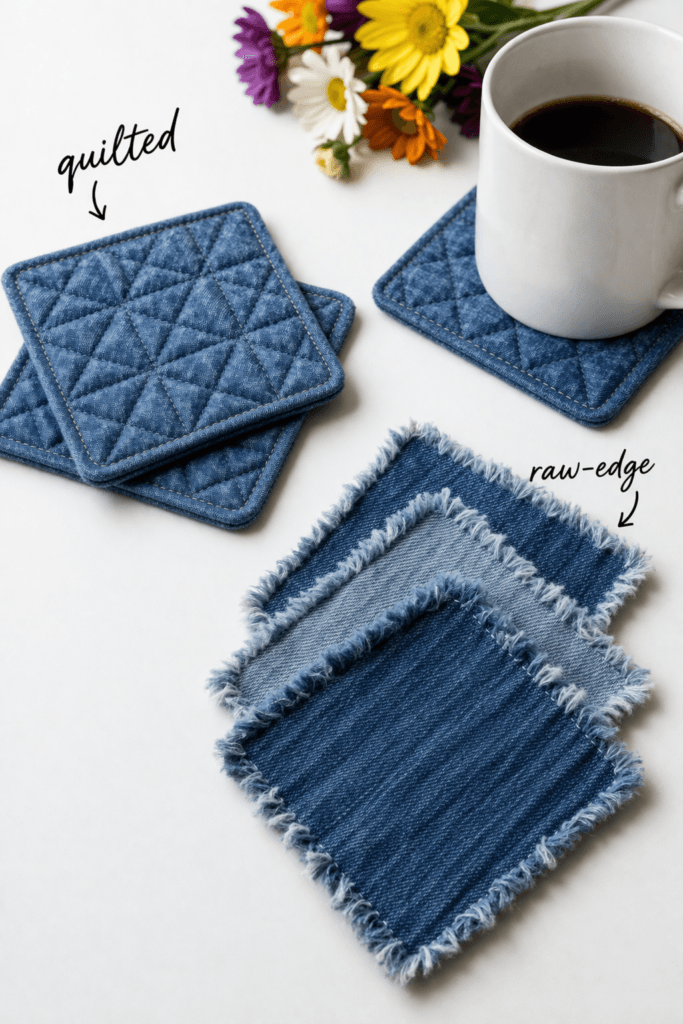
Finish strong with denim coasters that are both practical and a little bit pretty. They’re quick to make, easy to customize, and one of those small details that quietly makes your space feel more pulled together.
What makes them so good
- Durable enough for everyday use
- Adds a subtle layered texture to your table
- Easy to mix and match for a soft, collected look
What you’ll need
- Denim scraps or old jeans
- Batting or padding (optional for quilted styles)
- Thread, needle or sewing machine, rotary cutter
- Fabric glue or fusible interfacing for no-sew options
How to make them
The process is simple, cut your shapes, layer if needed, and stitch or secure the edges. They don’t need to be perfectly identical to look good. A little variation actually makes them feel more collected and intentional.
Quilted & Raw-Edge Denim Coasters
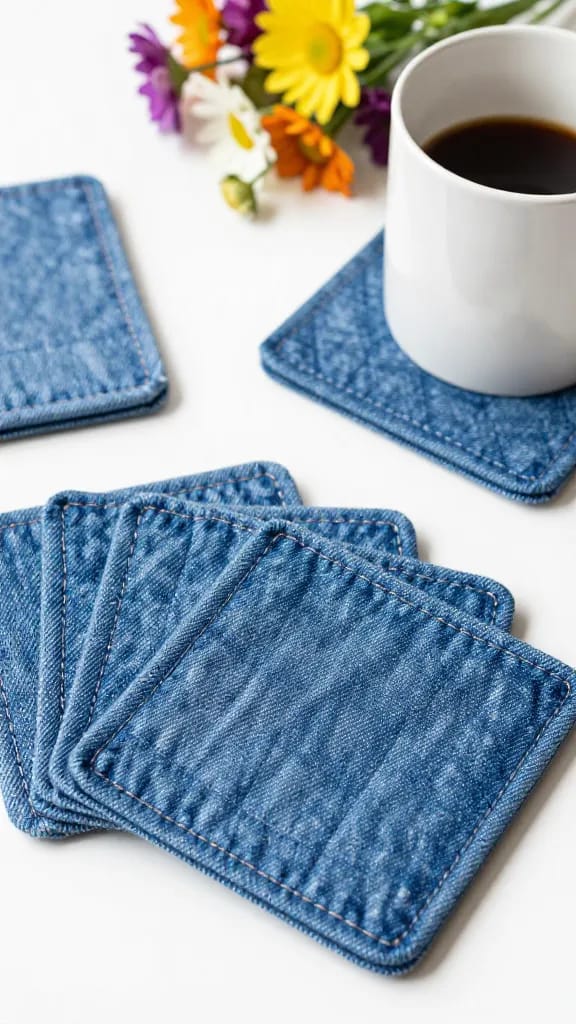
These coasters are the perfect "quick-win" project, adding a soft, textured touch to your coffee table in just a few minutes.
What to Cut- The Shapes: Use a rotary cutter to cut 4.5-inch squares. You will need two squares for every one coaster.
- The Core: (Optional) For the Quilted Version, cut a 4-inch square of thin batting to layer inside for extra absorbency.
- Layering: Stack two denim squares with the "pretty sides" facing outward. If you're going for the Quilted look, sandwich your batting in the middle.
- The Stay-Stitch: For both styles, sew a straight square border about 1/2 inch in from the raw edges.
- Texture Path A (Quilted): Sew a simple "X" from corner to corner through the center, or add a few vertical lines to give it that classic padded feel.
- Texture Path B (Raw-Edge): Leave the center plain and use a seam ripper to pull the loose horizontal threads away from the edges until you hit your stitch line.
- The "Magic" Step: Toss your finished coasters into the laundry with your next load of towels. The agitation will cause the edges to "bloom" into a soft, beautiful fringe, while the quilted version will take on a cozy, puckered look.
Helpful Tip
If you want your coasters to be extra absorbent for iced drinks, use the waistband section of your old jeans for the backing—the extra thickness provides a natural "buffer" for condensation.
Styling tip
Stack a few in slightly different denim tones or shapes for a soft, layered look. It’s an easy way to make even a simple table feel a little more styled.
☕ Shop the Essentials: Denim Coaster Edition
Small details, big impact. These tools make creating your DIY denim crafts quick, easy, and perfectly frayed.
As an Amazon Associate, I may earn from qualifying purchases at no extra cost to you. Thank you for supporting HypeVine!
Small Projects, Big Cozy Impact
You don’t need a full room makeover to make your space feel different. Sometimes it’s just a few thoughtful details, like a table runner, a plant hanger, or a set of coasters, that bring everything together.
These denim projects are easy to start, fun to make, and actually useful once you’re done.
Save this for later, try one this weekend, and enjoy the process.
Love these upcycled ideas?
There’s more inspiration waiting for you! Explore our collection of seasonal decor, easy DIYs, and handmade gift ideas.
Explore the Crafts Gallery →