

I love the small comforts that make home feel a little softer. On busy days, a tiny handmade catchall can calm the clutter and bring a sense of ease to everyday routines. In this guide, I’m sharing a warm, low-pressure way to make simple air dry clay trinket dishes that feel personal and quietly special.
These little bowls fit easily into real life. Set one by the sink, on a nightstand, or near the front door. You can shape several in one relaxed afternoon, then let them dry while you get back to everything else on your plate.
This project is beginner-friendly, forgiving, and designed to feel calm from start to finish. No kiln, no rush, just simple steps that lead to something useful and lovely.
Why this works:
- You can shape several small dishes in a single afternoon.
- No kiln is needed. Crayola Air Dry Clay cures white in about 2 to 3 days.
- These trinket dishes are lovely for gifts, entryways, vanities, and bedside surfaces.
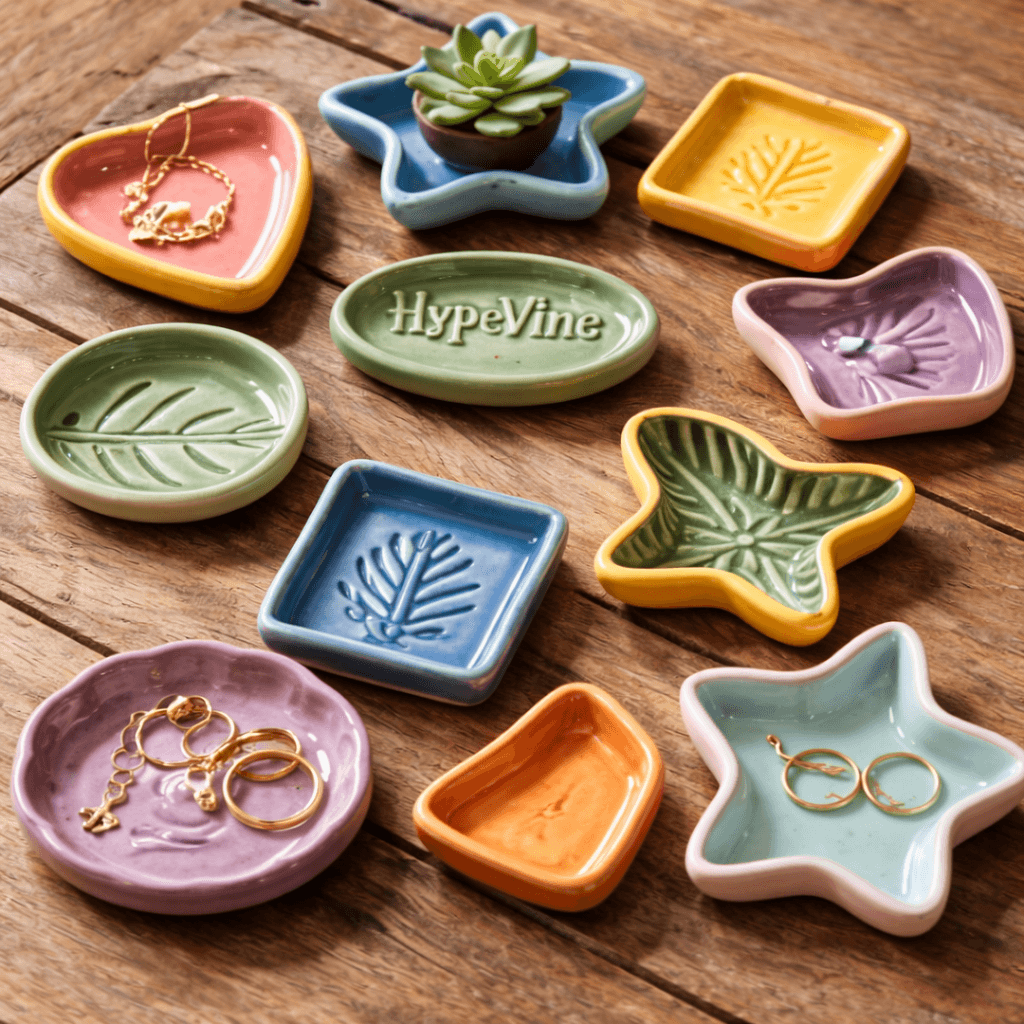
- Soft, rounded edges and light texture help them look like real ceramic.
- Finishes like acrylic sealers are not food safe, so these are best for jewelry and small items only.
You can shape several small dishes in an afternoon, then let the material cure over the next few days so you are never rushed. The goal is a soft, rounded look with gentle texture so each piece reads like real ceramic.
Who this is for: gift makers, apartment dwellers, parents crafting with kids (with supervision), or anyone who wants a tidy little spot for rings, keys, hair ties, or loose change.
Here are a few Amazon finds if you want to grab everything in one place:
- Crayola Air-Dry Clay, White – soft air dry clay that cures to a smooth white finish, perfect for jewelry and trinket dishes.
- Nonstick Silicone Craft Mat – protects your table from clay, paint, and sealer and makes cleanup easy.
- Acrylic Paint Set in Soft Neutrals + Metallics – great for painting rims, color blocking, and simple patterns.
- Detail Paint Brush Set – fine brushes for small hearts, initials, and line details.
- Gold and White Paint Pens – for lettering, dots, and delicate accents on your dishes.
- Fine Grit Sanding Sponges – to smooth rims and edges once the clay is fully dry.
- Matte Mod Podge Sealer – a soft, low-sheen sealer that protects paint and details.
- Glossy Triple-Thick Glaze – a shiny topcoat that gives a ceramic-style finish (for decor use only).
Key Takeaways
- You can shape multiple air dry clay pieces in an afternoon and let them cure for 2 to 3 days.
- Crayola Air Dry Clay is easy to find in many U.S. stores and online.
- Simple rounded edges and gentle texture give a ceramic-style look without a kiln.
- This is a beginner-friendly, low-stress project and a thoughtful handmade gift idea.
- Use sealers for protection, but remember they are not food safe. These are catchalls, not serving dishes.

Set the vibe for an easy, inviting craft afternoon
Set aside about an hour, put on a favorite playlist, and clear a small workspace. You do not need a full craft room for this, just a small spot on a table.
Set-the-mood shopping list for your craft afternoon:
- Neutral Stoneware Mug – for tea, cocoa, or a warm latte while you roll and shape your clay.
- Neutral Scented Soy Candle Set – gentle, not-too-strong fragrances that feel calm while you work.
- Rechargeable Electric Candle Lighter – flameless and easy to keep on your craft cart or tray.
- Small Bluetooth Speaker – perfect for a relaxing playlist or podcast while your clay rests and dries.
- Wooden Styling Tray – holds your candle, drink, and finished trinket dishes for easy styling photos.
- Small Faux Greenery Stems – a simple way to add a bit of fresh-looking texture to your photos or entry table.
Keep it simple and low-pressure. This is just a small craft session, not a big project.
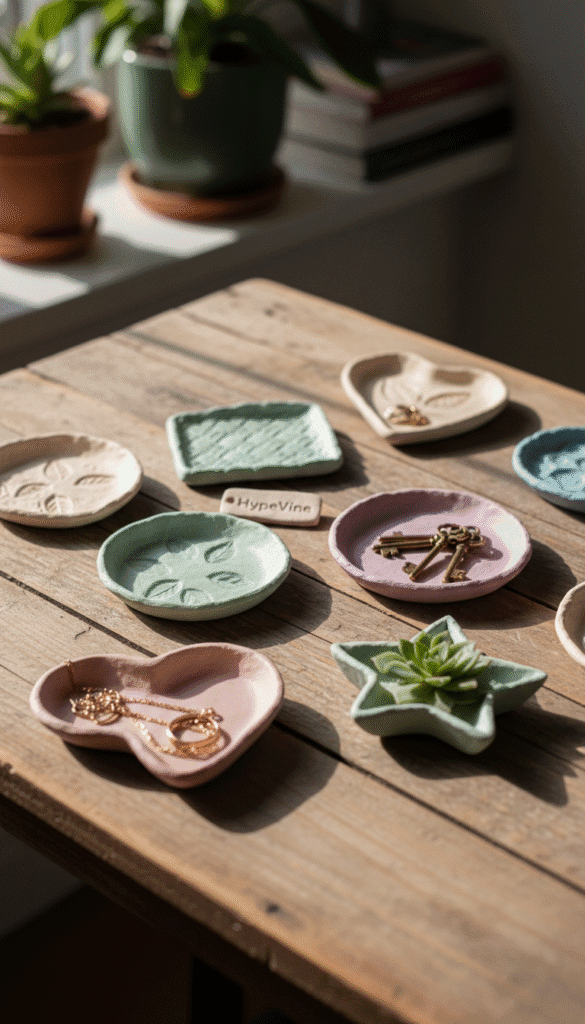
Where these little dishes fit in your home
These air dry clay trinket dishes tuck into so many small spaces:
- By the nightstand for rings, earrings, and watches
- On a bathroom counter for hair ties, bobby pins, or small skincare items
- In the entryway for keys, coins, or a favorite lip balm
- On a dresser to hold perfume samples or tiny mementos
- Near your sink as a safe spot for jewelry while you wash dishes
You can use a small bowl you already own to shape the dish so there is no need for specialty molds.
Quick note on timing: make today, let it dry over the next few days
You will do the hands-on part now, then let the dishes dry and cure in stages.
- Most pieces take about 2 to 3 days to dry. Thicker dishes may need more time.
- As the clay dries, it gets lighter in color and no longer feels cool to the touch.
- Different pieces may dry at slightly different speeds, depending on thickness and humidity.
Bookmark or pin this post so you can come back when your dishes are dry and you are ready to sand, paint, and seal them.
Shopping list: simple supplies for air dry clay trinket dishes
Start with a short, focused supply list so you can begin right away. Most of these can be found at Walmart, Target, Michaels, or Amazon.

Grab-this-first list
- Air dry clay (I like Crayola Air Dry Clay for a clean, white finish.)
- Rolling pin (A dedicated craft rolling pin helps keep slabs even.)
- Knife or cutter (A simple craft knife or supervised kid-safe cutter works fine.)
- Small bowl for shaping the dish
- Soft cloths and water for smoothing edges
- Wax paper or parchment sheets to protect your surface
Texture toolbox
Use these simple pieces to add pattern and texture:
- Paper doilies for a lace-inspired finish
- Corrugated cardboard for fine, linear ridges
- Coffee cup sleeves for subtle, repeated texture
- Clay texture rollers or stamp set for simple, pretty patterns
Finishing supplies
- Fine sandpaper for smoothing edges
- Paint or paint pens for color and small details
- Sealer options such as Mod Podge or a glossy topcoat like DecoArt Triple Thick
Optional add-ons:
- Nonstick silicone craft mat
- Soft paint brush set
- Clay stamp set
- Extra acrylic paint colors
- Craft cleanup cloths and tools
Prep your air dry clay so it’s not too sticky
A short pause turns sticky clay into something that rolls smoothly. Fresh air dry clay often feels tacky, and that is one of the biggest frustrations for beginners. The good news is that the fix is simple and gentle.
How I “rest” the material before rolling
- Pull off a small piece of clay and roll it into a ball.
- Gently pat it into a thick disk and place it on parchment paper.
- Let it sit for about ten minutes, depending on humidity, until the surface feels slightly firmer.
If the clay still grabs your fingers or tools, give it a bit more kneading to compress any air pockets.
When you roll the clay and notice small cracks, simply knead and recompress, then try again. This helps your trinket dish dry more evenly and feel sturdier.
Keep-your-clay-fresh tip
- Reseal the main container of clay between steps so the rest does not start to dry out.
- This little prep habit works for most air dry clay projects, so you can reuse it anytime.
Once your piece feels a bit firmer and less sticky, you are ready to roll it out.
Roll clay and cut your trinket dish shape
Now you will create a smooth, even slab of clay that you can cut into your dish shape.
Aim for about a quarter inch thickness. This keeps your dish strong without feeling heavy.
Rolling pin tips for an even slab
- Roll from several directions, not just one.
- Pause and rotate the clay as you work so the thickness stays consistent.
- Use your eyes and fingertips to check for thin or thick spots.
- A slab that is about 1/4 inch thick is a sweet spot for small trinket dishes.
If the slab stretches or looks uneven, gently press it back into shape and roll again.
Cutting options:
- Use a small bowl as a template and trace around it with a needle tool or knife.
- Try cookie cutters for quick, tidy shapes like circles, hearts, or flowers.
- Draw a paper template for custom shapes, then trace and cut around it.
Smooth edges for a ceramic look
After cutting, soften the rim with a damp fingertip. That gentle rounding is what makes your dish look more like real ceramic.
- Lightly blend the cut line so edges feel smooth and seamless.
- Do not stress about perfection. Slight variations add charm.
If you see stubborn cracks, ball the clay up again, compress it, and re-roll. The clay may look a bit darker when damp, then lighten again as it dries, which is completely normal.
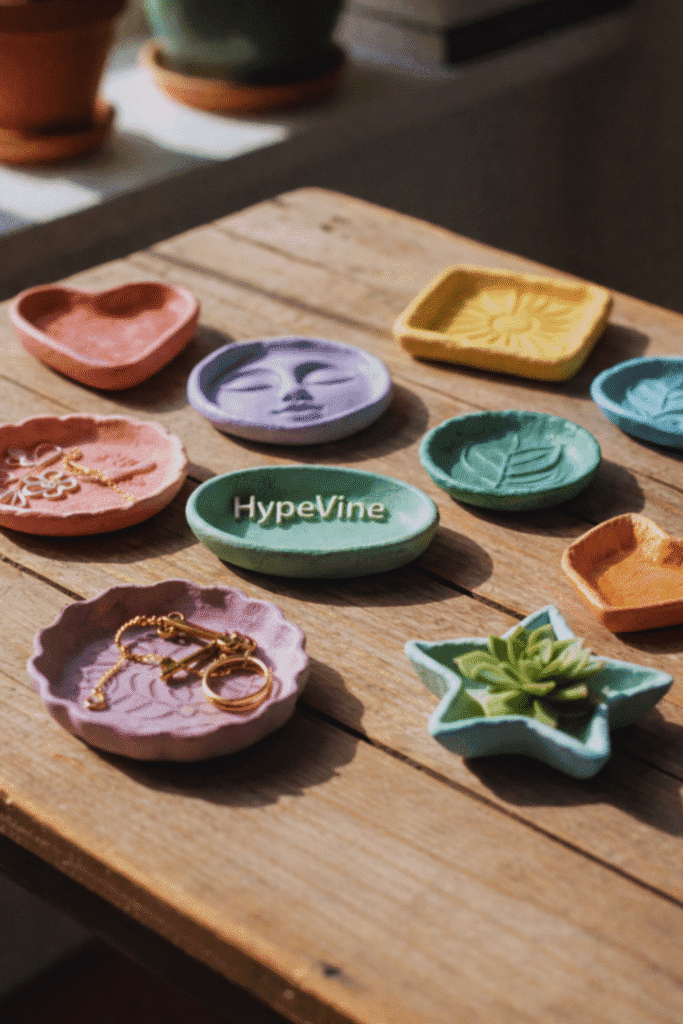
Add texture and pattern without stressing about perfection
This is the fun part. You do not need special tools to add beautiful surface details. Household items work surprisingly well.
When the surface is “just dry enough”
For some texture techniques, you will want the surface to feel slightly firmer:
- Gently tap the center of the clay.
- If your finger does not leave a clear print, it is ready for stamps or texture tools.
- If the clay is too soft, heavy pressure will distort the shape.
Easy texture ideas from things you already have
Try pressing:
- Paper doilies for a lace-like pattern
- Corrugated cardboard for fine, linear lines
- Coffee cup sleeves for subtle repeated texture
- Textured fabric or napkins for soft impressions
- Kitchen stamps or cookie cutters for simple motifs
Personal touches for gifting
Add small details to make each air dry clay trinket dish feel personal:
- Press initials or a short name
- Add a small heart or simple symbol in the center
- Create a repeat pattern around the rim
If you press too hard and the design looks messy, smooth the area with a damp fingertip, let it rest for a few minutes, and try again more lightly.
These little dishes make sweet teacher gifts, stocking stuffers, and thoughtful “thinking of you” surprises.

This beginner-friendly kit includes everything you need to make your own small clay jewelry bowls without a kiln. It is perfect if you want to test out air dry clay before buying full-size supplies, or if you are crafting with kids and prefer an all-in-one set. Use it to practice simple textures, soft rims, and painted details, then move on to custom trinket dishes using the techniques in this tutorial.
Shape, dry, and finish your dish so it looks polished
Now you will turn your flat clay shape into a small dish and give it a clean, finished look.
Molding the form
You have two easy options:
- Gently bend the edges up by hand for a relaxed, organic rim.
- Slump the clay shape into a small bowl so it takes on a smooth, even curve.
Both options give you a soft, handmade feel. Choose the look you like best.
Prevent sticking
Place a thin layer of parchment, wax paper, or a paper towel between the clay and the mold. This helps the dish release cleanly once it is dry and prevents glossy molds from gripping the surface.
Drying cues and timing
Let the dishes sit undisturbed on a flat surface.
- Expect about 2 to 3 days of drying time, sometimes more if your pieces are thicker.
- The trinket dishes will feel very firm, look lighter, and will not feel cool to the touch once fully dry.
Resist the urge to rush this step. Slow, even drying helps prevent cracks.
Refine and finish
Once the clay is dry:
- Lightly sand the rim and edges for a smooth, comfortable feel.
- Wipe the dish with a slightly damp cloth to remove dust.
- Add paint details such as a metallic rim, color blocking, or small doodles with paint pens.
Sealers and extras
To protect your design:
- Use matte Mod Podge for a soft, low-sheen finish that works well under stickers.
- Use a thicker glossy topcoat, such as a glaze-style sealer, for a shiny, ceramic-like look.
- Try thin, flexible washi-style stickers for a fun accent that will not feel bulky.
Important: These finishes are not food safe. Use your air dry clay trinket dishes as catchalls for jewelry and small items, not for snacks or serving food.

This skinny gold foil washi tape set is perfect for adding a soft border or tiny patterned edge to your clay trinket dishes, jewelry bowls, and gift boxes. The thin rolls work beautifully around curved rims, journal pages, and planner spreads without feeling bulky. Use a few coordinating colors to frame your finished dishes, dress up a styling tray, or wrap them as sweet handmade gifts.
Final Thoughts
This small project is a reminder that one easy afternoon can result in something both useful and meaningful. With simple tools, gentle shaping, and a bit of patience, you can create air dry clay trinket dishes that help your home feel more collected and calm.
Start with one dish. When you feel ready, try a new shape, a soft texture, or a painted rim. Each piece is meant to feel relaxed and handmade, not perfect.
I’d love to see what you create. Share your favorite shapes, textures, or color ideas in the comments, and save this tutorial so you can come back once your dishes are fully dry and ready to finish.
You really can do this, even during a busy week. It’s simple, low-stress, and quietly satisfying. If you’re in the mood for more easy projects like this, you can browse the Crafts page next. Happy creating. 💚